Is it necessary to brand your blog and business or have a brand board?
Branding your business and blog is one of the most talked-about topics on the internet, especially on Instagram, and it’s sometimes scary.
How can you tell a blogger or small business owner to try to DIY their business and get their things together to brand their blog or business? When they cannot piece together the perfect colour and fonts for their brand and blog.
Although, fonts, colours and logos is not the only thing that makes up business branding.
Branding is the combination of the unique elements that make up a brand.
Everything makes up a brand’s personality, resulting in how customers and the ideal audience view and perceive your brand.
However, understanding the complete concept of branding and implementing your branding as a beginner blogger or a new small business owner is intimidating, so we’ll start with having a brand board.
And, I understand you are feeling overwhelmed already trying to understand how to get the right colours, logo, fonts and brand kit or brand board for your business.
Sometimes, you read about having a brand kit; the next minute, you see a brand style guide; other times, you hear a brand mood board and become confused.
Fortunately, in this blog post, you’ll learn what is a brand board, the difference between a brand board, a brand mood board and a brand style guide, the elements of a brand board, and how to create a brand board.
And you can download and edit our free brand board template in Canva. So without wasting time, let’s dive into it.
What is a Brand Board?
A brand board is a quick and easy guide or document referencing a brand’s visual elements and style.
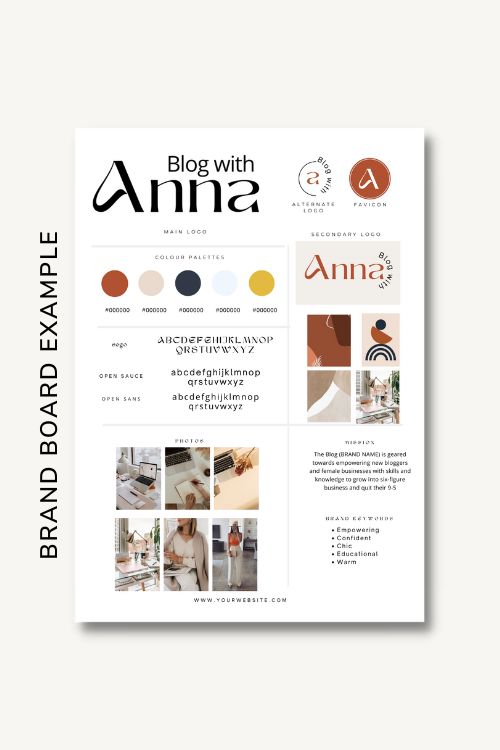
A brand board serves as a roadmap, a pictorial summary of all elements that make up a brand, such as logos variations, sub marks, image inspirations, textures, patterns, fonts etc.
Creating a brand board for your brand, blog, and business makes it easy to maintain consistency and build a memorable brand.
Although, people often misuse a brand mood board, brand style guide and brand board. A brand style guide differs from a brand board and a brand mood board or mood board.
Brand Board Vs. Mood Board Vs. Brand Style Guide
A branding mood board is a collection of all visual elements, inspirations, images, textures, photos, and colours that reflects the kind of brand message and personality you want others to perceive.
Your Brand mood board is a form of creativity and a starting point for designing your brand identity. I prefer to call a mood board a tool to form and create a brand identity and your brand board.
Simply put – to create a brand mood board, you’ll gather images, textures, fonts and colours that align with the brand personality you want to build, and you can do this using Mood board Canva templates or on Pinterest.

Brand Board
While a Brand Board contains your logos, fonts, elements, colours and all visual elements of your brand after your brand identity is formed.
A Brand board is a handy visual guide for introducing your brand to anyone and helps build brand consistency. Below is a simple brand board example;
Brand Style Guide
While, a Brand Style Guide or Brand Guideline is a brand rule book or guideline that states how to use, communicate and apply every aspect of your brand.
This is an advanced form of branding kit, and it’s shared internally and externally with your web designer, brand partner, etc.
Example – With a brand style guide, you can specify what background to place your logo on, what fonts to use on your social media designs, and even how to arrange and post content on your Instagram.
And that’s why as bloggers and small business owners, completely nailing your branding can be a chore. So, start with a brand board.
Note: This post may contain affiliate links, and I will earn a commission which I use in running this blog if you buy with my link. This won’t attract an extra cost to you. Read my Disclaimer policy here
Why is a Brand Board Important for Your Blog and Business?
Now you know the difference between a brand board and a brand style guide. What’s the importance of having a brand board?
1 | A brand Board Serves as a Visual Guide:
Have you ever had to work with a website designer or graphic designer and you have to fill out a questionnaire about your brand or blog, so they can nail your brand personality?
Now, imagine if all you’d do is send a document that accurately describes your brand, blog and business and contains all your brand elements.
That document you’ll send across is a brand board and can serve as a visual guide for your business.
2 | Helps you Stay Consistent with your Branding;
If you’re not a designer, or a perfectionist (lol), it is easier to be inconsistent with how you use your brand elements.
Inconsistent branding is common for bloggers and small business owners trying to DIY everything.
And you’ll start using different fonts for Instagram, Pinterest, and other brand graphics. Well, I’m not judging you cus I’ve been there.
But, with your handy brand board, you can stick with your brand colours, fonts, tone, image styles, etc., and you can even add your brand kit in Canva for easy referencing when designing.]
3 | It helps you Nail and Attract the Right Audience
Having your brand board helps you maintain brand consistency and clearly spell out your brand personality to your audience.
And when you consistently use your brand elements, you start attracting the right audience that can relate to your brand.
Elements of a Brand Board: What to Include in Your Brand Board
Before we jump to create a brand board, what should you include in your brand board?
You’ll need to have the elements of your branding board ready, so you can easily fill them into a brand board template. Here’s a list of elements to include in your brand board design.
1 | Brand Logo and Logo Variations
The importance of a logo to a brand, blog and even small business owners needs no introduction.
Logos help you introduce your brand. It is a visual expression of your brand but not the core brand.
Although many people trying to DIY their brands often go with just one logo, they soon realize that just one logo cannot do the magic.
Imagine you have just one logo, it could be a horizontal or circle logo, and you need your logo to fit into a space in your website or social media design, but unfortunately, it just can’t.
This is why designers create at least 3-4 logo variations for any brand.
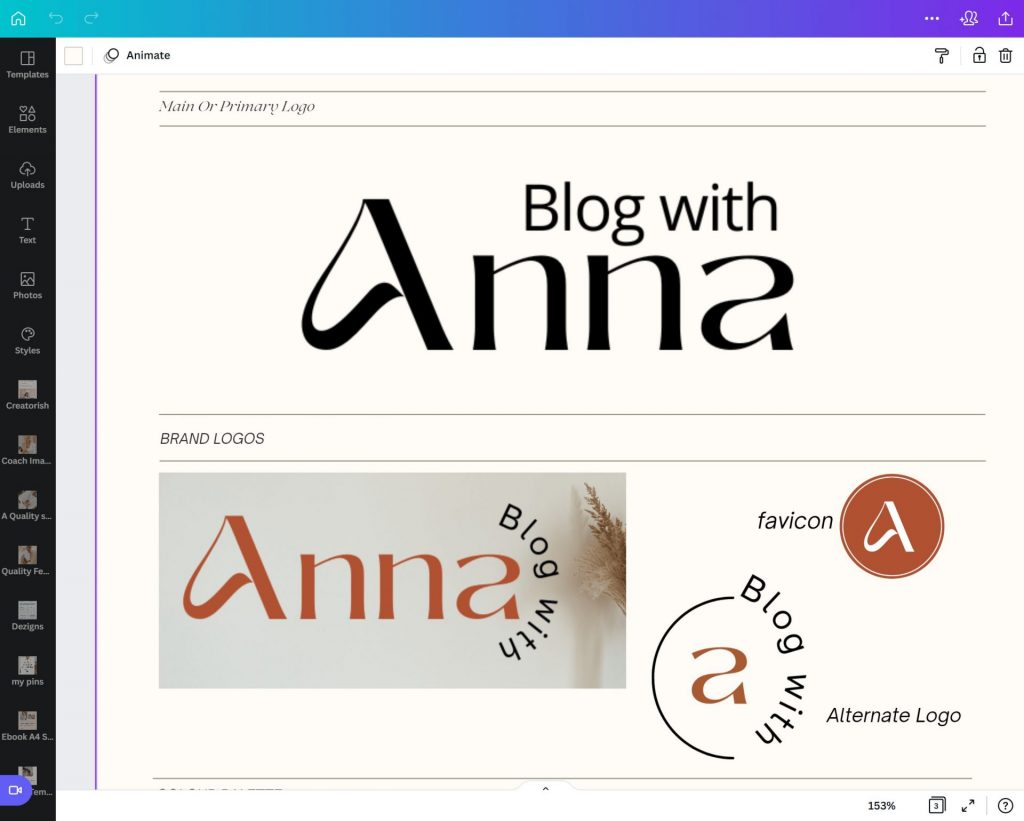
Therefore, in your branding board, you need to include your primary logo, secondary logo, sub mark logo and Favicon.
a | Primary Logo:
Your primary logo is the main logo for representing your brand and blog. Your other brand logos will be built off your primary logo.
Most primary logos are horizontal, need lots of space, and fit perfectly as the main logo on the website. (i.e., logo for headers).
b | Secondary Logo:
A secondary logo is an alternate logo. You’ll use your secondary in places where your primary logo cannot fit – For example, in mobile website headers, prints etc.
c | SubMark Logo
A submark logo is a smaller version of your logo. It may include your brand name, just initials, or elements from your main logo.
Although, when someone sees your sub mark logo, they should be able to identify that it’s your brand.
Sub mark logos fit perfectly in social media designs, on Pinterest, on website or blog footers, etc.
d | Favicon:
Favicons are important for every brand with a website, and of course, businesses with an online presence tend to have a website.
Favicons are the small logos used in identifying a website. They are small and can be your brand initials or a symbol and element of your brand.
Example: If you have a WordPress blog without a Favicon, WordPress automatically displays their Favicon.
And if someone is browsing the web with other pages open on their computer, they cannot identify which is your site. A favicon for WordPress blogs is usually 500×500 in size.
2 | Brand Colour Palette & Colour Codes
Another important element to include in your brand board is your brand colour palettes and the colour codes; it could be hex, CMYK or RGB codes.
You must add your colour codes to your brand board, so anyone can pick up your brand board and still create designs with your exact brand colours.
For example: if your brand colour is brown and its hex code is A6978A, include it in your brand board, else members of your team will go hunting for any similar brown type.
And if you are DIYing your brand, keep your brand colours between 5-6, so you don’t have a situation where you use every colour randomly, and your brand starts looking inconsistent.
3 | Fonts
Often, we disregard the importance of fonts and how the type of font we pick as our brand font also reflects our brand adjectives (i.e., describe our brand).
Is your brand, blog, or business luxury, chic, elegant, minimalist, retro, playful, romantic, calm, bold, or straightforward?
The type of brand fonts you pick can reflect that.
So, if you are DIYing your brand, learn how to pick the right fonts for your business.
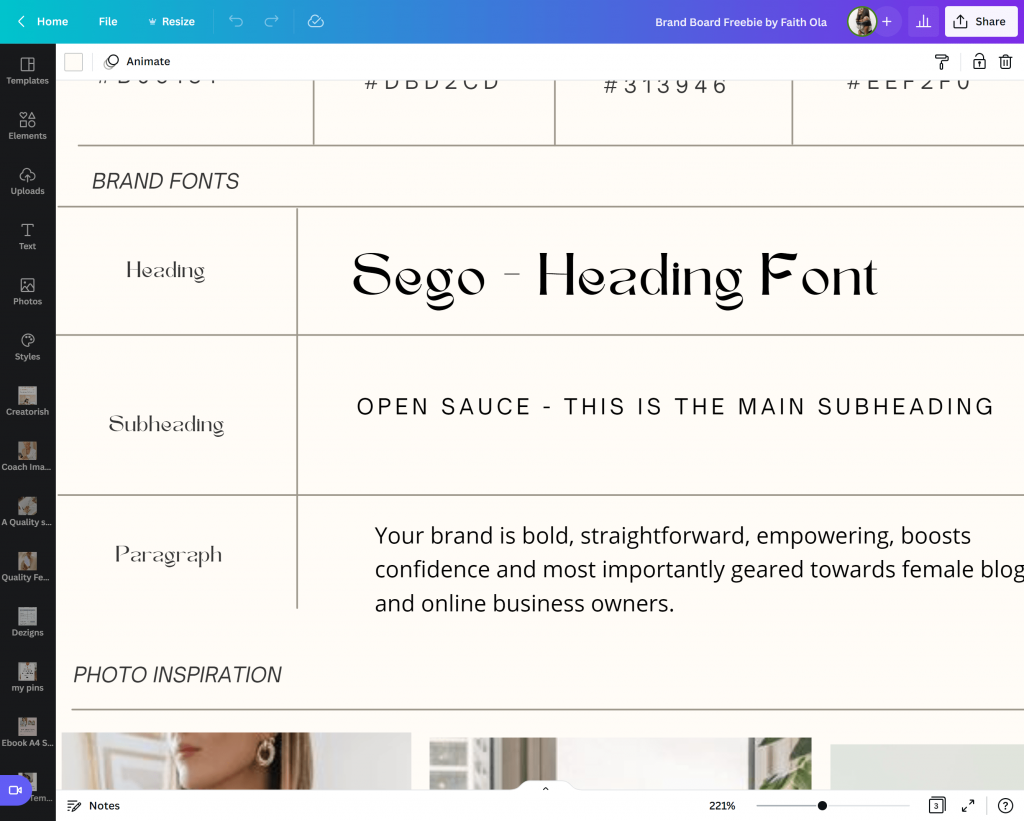
Usually, your brand fonts consist of 3 font categories: the heading (Primary fonts), body (secondary fonts), and decorative or accent fonts.
Your font is also an important element of your brand. Your brand board should contain your font styles and names.
4 | Patterns and Textures
Patterns and textures give depth and life to your brand and are decorative designs that you can use in your website, social media designs, business cards etc.
Example: A wellness brand may have elements that symbolize peace, leaves and nature as their patterns and textures.
While a Bohemian theme blog or website will have Boho textures and patterns on its brand board.
5 | Images for Inspirations
One of the ways to build your brand identity is to gather images that reflect the kind of brand and mood you want your brand to exude.
And even after building your brand identity, you should include these images on your branding board.
So, anyone who receives your mood board can know right off the bat the type of images and tones they should include in any of your brand’s visual designs such as social media, website, business cards etc.
Defining your brand elements and including them in your mood board will help you build a strong reference guide for your brand, and this helps in maintaining brand consistency.
Therefore, these are the essential elements to include in your brand board; it doesn’t matter if you blog or are a small business owner.
To maintain consistency and have a memorable brand, you must have your brand boards ready.
Tools for Creating Your Brand Board
Now that you know what to include in your brand board – let’s quickly run over tools for creating a brand board for your business;
1 | Canva:
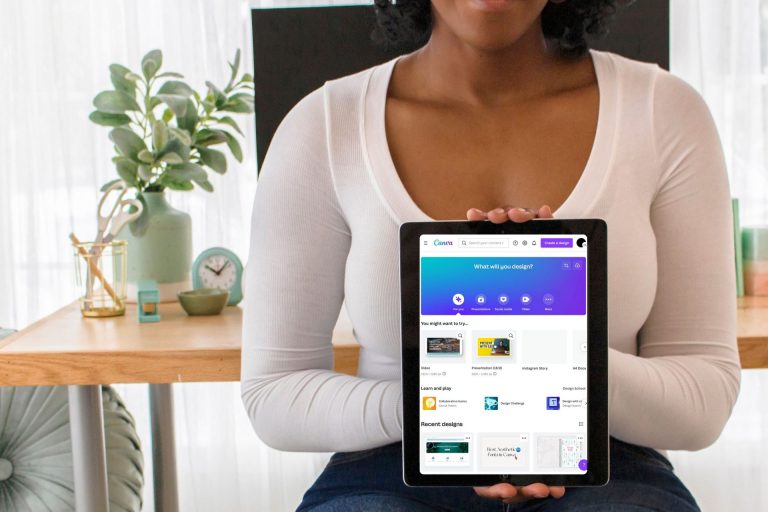
Canva is an online graphic design tool to simplify complex designs and empower everyone with designs. With Canva, you don’t need to have any design experience or be a graphic designer.
You can easily make your brand board design in Canva and even explore the Mood board templates section in Canva for inspiration.
You can upload your brand elements, such as your brand fonts, colour palettes, pattern and textures, and logos and set up your brand board in Canva.
If you stick around a little longer, in this blog post, I’ll show you how to make a brand board in Canva using free brand board Canva templates, and I’ll show you how to slot and upload your design elements in Canva.
Also, using Canva as a small business owner and blogger is a game-changer, as it can help you maintain consistency and create on-brand graphics when you upload and set up your Canva brand Kit. If you are new to Canva, Try Canva Pro for Free.
2 | Creative Market:
Creative Market is not necessarily a tool for creating a Brand board.
Although, it is one of the best design markets where you’ll find assortments of designs, brand board templates and brand style guide templates for creating your brand board.
Do Note: You “ll also find brand board templates made with Canva, Adobe Illustrator or Photoshop on Creative Market. It is just a marketplace to buy your brand board templates.
3 | Adobe Illustrator:
For non-designers trying to DIY your brand, if you have no prior design skill, using Adobe to create your brand board will be overwhelming as it’s quite a learning curve.
But if you’re conversant with Adobe Illustrator, you can create your brand board using Adobe Illustrator.
4 | Canva Colours:
Generating the right colour scheme and colour palette for your brand is essential, and if you’re DIYing your brand, getting stuck on what colour to choose is common.
Canva Colors can help you find the right colour palette and show you the meaning of a colour, its symbolism, and curate colour palettes.
Fontpair.co
Font pair is an extensive library showcasing different fonts and font combinations. If you feel stuck on what type of brand fonts to choose, then try font pair.
With Font pair, you’ll find different font pairing styles and combinations; also a tool for testing several fonts to add to your brand board.
8 Essential Tips for Creating a Branding Board and Brand Identity
When creating a brand identity and branding board design, many elements come into play even before you start assembling elements for your branding board and brand identity.
Because you’re trying to DIY everything, you forget about the most important things or, let’s say, go after things you shouldn’t, because you don’t know how to create a memorable brand identity;
1) Know and Understand Your Audience
The first thing to note when creating your brand board or brand identity is to understand and know your audience.
Because your brand is not for you. You should focus on creating a brand that speaks to your audience’s problem, a brand your target audience can associate with.
For bloggers, your website is the first place your audience comes to associate with you after discovering you on any platform.
So do you have a defined niche, or are you speaking to everyone and eventually speaking to no one.
I’ll state that it’s easier for your audience to identify with the type of content you’re creating as a blogger because they can read through your articles.
While for service providers, freelancers, photographers, coaches, etc., your visual branding elements and what they see will convince your audience when they land on your page.
So, identify your target audience and ask yourself, what’s their pain point?
2 | Pick a Memorable Brand Name
Your brand or blog’s name is the first impression you’ll give to potential readers or customers.
You want to choose a name that is catchy, brandable, easy to remember, and suits your brand.
However, bloggers and small business owners sometimes rush the process of picking a unique brand name because they are in a hurry to start a blog or start their business.
Your brand name is essential for creating a memorable brand and building your brand design.
When choosing a brand name, think about your audience – is your brand name memorable? How do you want people to identify with your blog or business by just hearing it? Is the name brandable?
I’ll admit that choosing a name for your business can be overwhelming, especially if you’re a perfectionist.
It took me 3 months to decide on a name for my studio business, and almost 4 months to decide on a name for my other lifestyle blog.
Waiting this long to choose a blog or business is bad and can cause procrastination.
So, here are my easy tips for choosing a blog name or brand name;
i | Research your competitions and see how they name theirs and come up with a better name
ii | Go with your name if you want to build the business around you, like Melyssa Griffin, Pat Flynn, Neil Patel, etc.
3 | Or shorten your name, just like I did – My name is Faith Oladosu, and my blog’s name was Oladosufaith’s blog.
This name is so long and difficult to remember, especially since it’s not an English name. So I use an abbreviation instead, “Faith Ola”.
Although, if starting afresh, I won’t use my name to start a business, so I can easily sell it off if I choose to.
4 | Mix your name with an adjective that describes the blog or business you want to start.
E.g., Jenna’s Crotchet, Janetheminimalist, Helene In Between etc.
5 | You can mix a few words describing the blog or business you want to build. E.g Vanilla papers – a journaling blog etc.
These are a few tips on naming your brand and business, but remember that you want it simple, easy to remember and unique.
3 | Brand Identity
Brand identity comprises all elements of your brand that create an impression on your customer. This includes how your customers feel about your brand, your values, how they relate to your products, etc.
The elements of your brand should convey the same emotions. These include colours, textures, fonts, your brand name etc.
For example – If you come across a brand or blog with the name “yoga mom” or “moms do yoga,”. What impression will you get before clicking on the website?
Your mind is already associating this website with yoga for mummies. And you won’t expect this site to have busy fonts or colours.
Rather, a warm, natural colour palette with straightforward fonts like San Serif’s will be ideal for this brand.
Also, infusing round shapes and forms like circles, ovals, and eclipses into this type of brand is ideal because they signify warmth, unity, love and community.
The idea is that your ideal audience and customers should feel your brand and resonate with it just by coming in contact with your brand.
It’s not about your logo, colours, and shapes, but your brand identity combines your brand elements and the impression it gives.
Your brand identity reflects everything you do, even down to your brand voice.
4 | Brand Personality
What is your brand personality? How do you want people to feel when connecting with your brand?
And if your brand is a person, who would it be? Is it happy and enthusiastic, fun, formal and serious?
To create a memorable brand, you need to define your brand personality; the truth is, your brand personality should reflect your ideal audience.
To nail your brand personality, create an ideal audience or customer avatar and think about your audience as just one person with a problem you can solve.
Creating an ideal audience avatar will help you nail down your niche as a blogger or if you are a beginner blogger.
5 | Brand Image and Visualization
Brand image is your potential customer or ideal audience’s perception and impression of your brand.
Although you have less control over how a customer perceives your brand, your branding and how you use the elements in your brand board can influence your customer’s view of your brand.
Think about most brands and blogs you’ve come in contact with. What perception do you have of them?
For example, these are my perception of the following brands and blogs I’ve come in contact with;
Creative Market – clean, professional and high-end for designs. Canva – creative, simple, evolving and empowering.
Notion – easy and less complex.
Flodesk– creative, beautiful and could be more.
Smart blogger – straight to the point, no fluff and educating
Jenna Kutcher-easy, warm and intentional
Herpaperroute – no fluff, helpful, unique and less salesy
Etsy – versatile, cheap products but spammy and less quality control.
So, think about the brands and blogs you love and wish to be like. What vibe do you get from them, and what’s something you notice from them?
I bet one thing you’ll notice from them is consistency in using their brand elements.
You’ll find their website, social media, and emails reflecting the branding elements in their brand board.
So, to build your brand and blog’s image, even as you DIY them, you need to maintain consistency. I’ll share more on this in a bit.
6 | An Outstanding Tagline
A tagline is a catchphrase or slogan for conveying your brand’s value and mission to a potential customer or audience at a glance.
Using taglines for your business, especially on your website, is important as this also shows up in Search and can help your potential audience identify with your brand faster.
For example – Canva’s tagline is “Empowering the world to design”. And my business tagline is blogging tips + Strategic Canva templates for small businesses.
If you don’t have a tagline for your blog and business, brainstorm and develop a simple catchphrase for your business.
But remember, your tagline is about selling your brand to a target audience at a glance, so include adjectives that qualify your brand.
To create a memorable brand tagline for your blog and business, consider your ideal audience and who you’re helping, their pain point and speak directly to it.
For Example – My favourite theme shop is Bluchic, and their tagline is “Feminine WordPress themes for Female Entrepreneurs.”
With this tag line, an ideal customer will perceive and expect what type of WordPress themes Bluchic offers.
7 | Brand Strategy
A brand strategy may seem complex. But think about it as everything you need to put together to create a unique and seamless customer journey.
This includes how you want your ideal audience or customer to feel when they come in contact with your business.
Your brand strategy also involves your brand tone, voice, core values, mission, brand promise, brand guidelines, brand style guide, visual elements (such as logos, fonts, colours, textures), etc.
There are different types of brand strategies, but the most common for bloggers and small business owners is a personal brand strategy, where you infuse your personality into your business and create products around that.
8 | Consistency
Consistency is important in showcasing your brand identity because there is no need to learn how to make a brand board or create a brand identity if you will not stick to your branding.
Inconsistency in using your brand elements makes the purpose of having your brand board and brand style guide pointless.
A branding board is a reference point and can help you maintain your brand identity, creating a lasting impression on your ideal audience.
Therefore, don’t just create the best brand board design and forget about it. Use your logos, fonts, and colour palettes, properly and in the right way.
With these tips for creating a brand board and maintaining a strong brand identity, let’s delve into how to make a brand board using a brand board template for Canva.
Free Brand Board Templates Canva
The next step in this guide is creating and editing a brand board in Canva. And if you don’t have your brand board template ready for editing, you can download my free brand board template, to help you create your brand board.
How to Create a Brand Board using a Brand Board Canva Template
When you purchase a branding board template, or even if it’s a free brand board template, you’ll need to edit the brand board template to fit your brand.
And for this tutorial, we’ll edit a brand board template in Canva to create a unique brand board for your blog and business in a few steps;
Step 1 | Login to your Canva account
The first step is to log in to your Canva account. It could be a Canva for free or Canva pro account.
Although I recommend that you have a Canva pro account because you’ll also create and set up your brand kit in Canva.
After login into Canva, click on the link in your PDF or wherever you have the mood board Canva template, and Canva will make a copy of it.
Step 2 | Create Your Brand Kit in Canva (optional)
This step is optional – if you use Canva to run your business or blog, then I recommend setting up your brand kit in Canva.
Because setting up your Canva brand kit makes it easier for you to maintain consistency when designing in Canva.
Read this In-depth tutorial for setting up your brand kit in Canva in 5-steps.
If you have done this already, let’s edit and create your brand board in Canva.
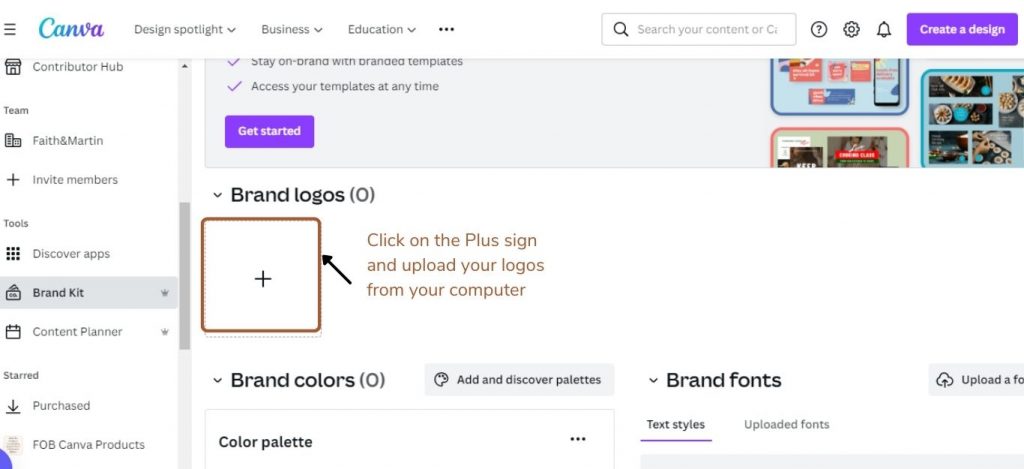
Step 3 | Upload and Add Your Brand Logos
The next step is to add your brand logos to your brand board template- to upload your logos in Canva.
Navigate to the left side toolbar, click on upload and upload all your brand logos from your computer to Canva as images or SVG.
After uploading your logos, add each logo to the logo section in your brand board template by dragging and dropping them.
Step 4 | Add your Colour Palettes and HEX codes
Colour palettes are essential elements of your brand board, so add your colour palettes.
Copy the hex code for each colour. And in the colour section of your brad board, edit and add the colours to each shape and the hex code at the bottom for quick reference.

Step 5 | Include your Brand Fonts in your Brand Board
Now, in the font section of your branding board, add your brand fonts – click on each font (heading, subheading and body fonts) and change the fonts in the brand board template to reflect your brand fonts.
And if your brand font is unavailable in Canva, you can upload your brand fonts or any custom fonts to Canva. Read how to upload custom fonts to Canva.
Step 6 | Add Images that Reflect your Brand
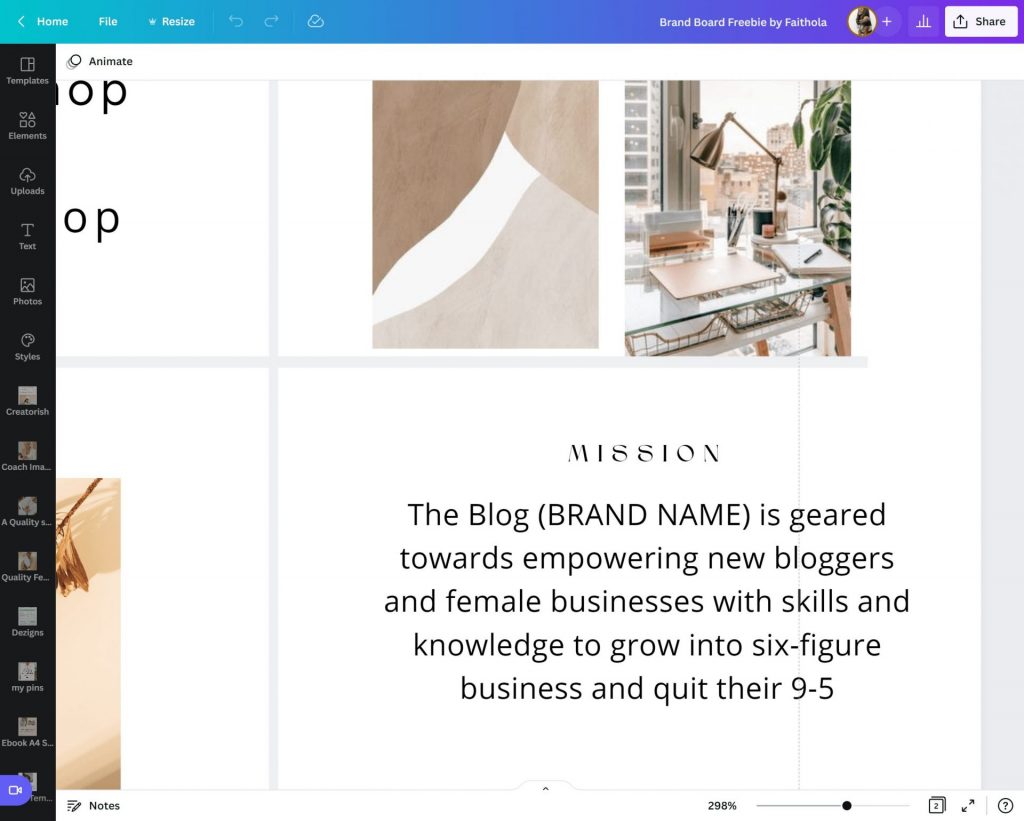
Images are important elements in visual branding. Your brand board should also have images that reflect the mood and tone of your brand.
Therefore, in the section for images in your brand board template, upload your images to Canva and add them to your brand board template by dragging and dropping them.

Step 7 | Upload and Add Your Brand textures and Patterns
When gathering ideas and images for your brand identity, you’ll also gather some textures and patterns that match your brand, especially from Pinterest.
Download these brand textures and patterns as images and upload them to Canva. Just like you’ll add an image to your brand board design, add these images to your brand textures and patterns section in your brand board.
Step 8 | Brand Mission Statement and Adjectives and Tone
Finally, add your brand mission statement in the mission statement section and include your brand adjectives and tone on your branding board.
This section is optional, although important because when you share your branding board with your designer, the person can easily grasp what your brand is about and provide the right service.
Brand Board Sizes
Brand board sizes vary based on the application you are using to create your brand board and where you want to share and use your brand board. But these are the typical Brand board dimensions;
- For Instagram and Pinterest, the dimensions are 1080x1920px
- For Canva, they are usually 8.5 x 11 inches, 840 x 2300 pixels,1000 x 2100 pixels.
- Adobe Illustrator, 1200 x 3120 pixels
Kindly Note: There is no specific dimension for a Brand board size. Just create a Brand boarding design that reflects all your brand’s visual elements.
Conclusion on Creating a Unique Brand Board For Your Blog and Business
The concept of having a ready branding board as a blogger and small business owner cannot be overemphasized.
With a clean, unique branding board and consistent use of your brand elements. You take your business from looking like an amateur to a professional-looking brand that understands its audience and creates a connection between your business and audience.
So are you ready to create your brand board? Grab our free brand board templates, and if you don’t have your brand kit and brand identity nailed, our editable custom brand kit will help you nail your branding.
Found this post useful? Save on Pinterest.


