A freebie resource library in WordPress is a page on your blog which contains all your freebies, content upgrades and best offers. Have you ever opened a blog or any website and you see a page that it is password protected?
A WordPress freebie resource library is sometimes called a resource library or library of freebies. Maybe you have been wondering what a free resource library is
all about and you have been trying to get one on your blog or website.
When I first created this blog post, I was just a newbie who learned how to create a resource library and host my freebies in my WordPress blog without spending extra cash. But the resource library wasn’t beautiful, clean or minimal looking and I wanted something better.
Also, this is an updated post and will walk you through how you can create and build a beautiful, clean and minimal looking resource library page in WordPress for free using Elementor Page Builder. I also have free resource library page templates for you. This is a Complete step by step guide on how to create a free resource library in Elementor.
What is a WordPress Blog Resource Library?
A resource library is a page on your blog or website that contains a collection of content upgrades and downloadables such as courses, cheat sheets, workbooks, templates, and tools for carrying out specific actions, etc.
Example;
As a blogger who educates other bloggers, tools on my page are those Blogging resources that will help other Bloggers. You can view my resource library here.
A resource library may be free or can be subscription-based, that is people may make payments to access your resource library page.
These options depend solely on your goal, but mostly it is given for free. I’m yet to come across a paid resource library used as an option.
A resource library may be an email opt-in freebie, and that is something your subscribers offer their email address to gain access to it.
For you to use a resource library page as an opt-in freebie, it should have a password, which means your subscribers will give their email address to have the Password delivered to their mailbox.
Importance of having a resource library as an email opt-in.
-
You can put all your content upgrades on a page, even those content upgrades attached to different posts on your blog, and this will make it easier for your readers to have access to all your valuables.
-
A resource library helps to boost the credibility of your brand before your readers.
-
A password-protected resource library page is an effective method of growing your email list, and an email list is needed to run a successful blog.
What is an Email List?
An email list is a list of your subscribers or readers who subscribed to your blog through your email opt-in, and it is like your community, your social media where you control what happens in there.
When a blog reader gives their email address to you, it means they have developed some levels of trust for your brand, and it may be due to the content they have read and, they are hoping to get more valuables when they gain access to your resource library.
Importance of having an Email list:
You give the rules about what happens from when you get a subscriber’s email address, and there is no algorithm like we have on Social Media;
1. Statistics show that email marketing has a high conversion rate of 40%.
Example; You have a list of 1000 followers both on social media and your email list and you pitch a product to both groups.
2. The chances of having subscribers in your email list buy your product are higher than that of a social media platform.
Why Emails Have Higher Opening and Engagement Rate Than Social Media
-
Due to the algorithm on social media, only a few percentages of your thousands of followers on social media will see your post.
-
People follow you on social media for different reasons, and some followers may not be interested in your brand. But with an email list, you have people ready to read your contents once you send out a notification email.
Now, let’s delve into creating your WordPress resource library page of freebies using Elementor Page Builder Plugin.
How to CREATE A Free Resource Library in WordPress using the free Elementor Page Builder
Tools Needed to Create a Free Resource Library in WordPress.
1. A new page on your blog or website: It could be a landing page created with Elementor or just a blog page.
2. Email Opt-in form:
I use Mailmunch and Mailchimp currently to create opt-in forms that collect my subscriber’s email address, and also send them a link to download their freebie immediately they sign up.
You can use any email marketing software to collects and deliver leads when creating your freebie resource library.
3. A cloud storage space:
A cloud storage space is a storage space where you can upload and backup your files, and I do not recommend that you upload your freebie directly to your Blog.
When you upload files such as PDF’s and videos to your blog directly, it makes your blog to become slow. When a blog becomes too slow, it generally has an impact on the SEO of your blog.
While creating our freebie resource library in WordPress, we will use Google drive (It is free for up to 15GB). Other cloud storage you can are Dropbox and One note etc.
4. Graphics Design Tool:
When creating a freebie resource library in WordPress, you need to add graphics, and to create these beautiful, stylish graphics, you can use an online graphics tool called Canva.
PS: I use Canva to create fillable Worksheets, e-books, Pinterest graphics, and design my opt-in freebies. You can use Photoshop or Picmonkey for creating your freebie graphics.
Also, if you want a stunning ebook, workbook, and lead magnet templates for your next freebie or info products, get them in my Canva template shop for bloggers, coaches, and creatives.
5. Elementor Page Builder Plugin:
The Elementor page builder is a great tool for building pages in WordPress. Elementor is one of the most widely used page builders because of how flexible it is and very easy. It has a free and paid version called Elementor Pro.
6. Bitly:
Bitly is not compulsory when creating a freebie resource library in WordPress, but it is for shortening URL, and to keep track of the number of clicks and downloads for each freebie.
7. Your Freebies:
After creating your freebie, you will have to upload it to your Google Drive storage and get the shareable link to your freebie, this free storage comes with your Gmail account.
Because we don’t want to upload the freebie directly to your blog, we will add a downloadable link which is the shareable link that you get from your freebie that you uploaded to your Google drive.
Steps to Create a WordPress Freebie Resource Library using Elementor Plugin.
Step 1-Install Elemetor plugin:
If you don’t have the Elementor page builder plugin active on your blog, you need to log in to your WordPress dashboard, click on plugins, add new, search for Elementor, install and activate the plugin.
Step 2-Create a New Page:
Click on pages, and add a new page, go to the area where you have to publish, click on edit, but switch the page settings to a password-protected page, set the password you will love to give out to your subscribers, make it simple and easy to remember.
i) Add a name to the page, e.g Resource library, Freebie Library or something more but the name should be short and simple.
ii) Scroll down a bit and on the right column will see a Default template, click on the drop-down, you will see Elementor Canvas and Elemenor full width, Click on Elementor Canvas.
iii) Now, you click on update, so every setting will remain, go down and click on Edit with Elementor, and this automatically brings you to the page builder with elements for creating your WordPress resource library with Elementor.
Before we go over to the second step, I will love to show you a few Blog Free resource libraries that are built-in WordPress using Elementor Page builder.
Note: Your style of resource library is dependent on how you want it. Each resource library design reflects the style of the blogger.
Examples of WordPress Resource Library For Freebies Built with Elementor;
1. A Freebie resource Library with just text and no images:
An example of a is a resource library page with just plain text is a Freebie library from The side Blogger, it has no images, but text and it still looks beautiful.
2. A WordPress Freebie Library with Images:
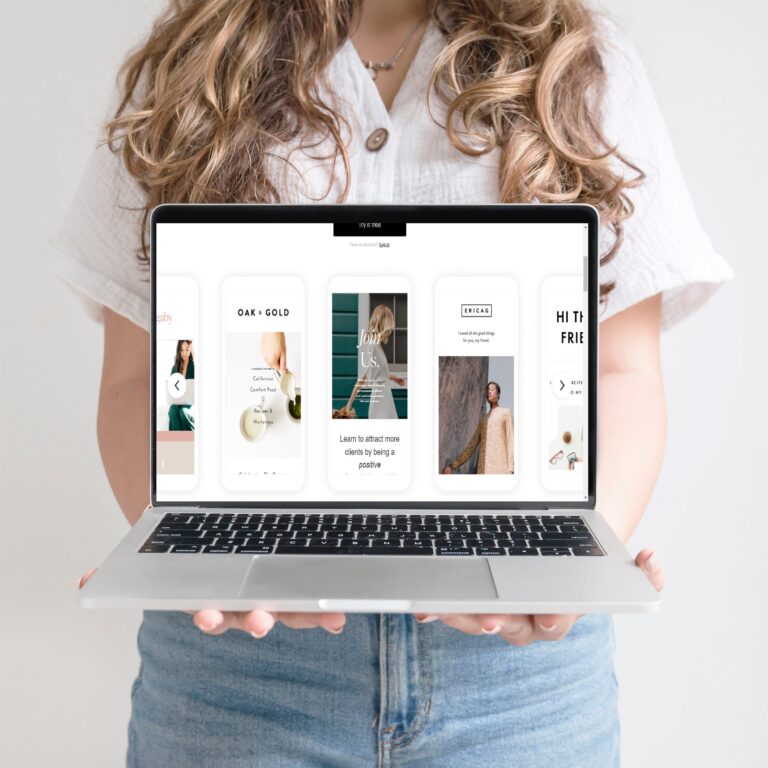
This type of resource library has images but it may be of two types, the first is a screenshot of resource of a resource library from Ciera Design, it has images but she uses the cover of her freebie, which is made with Canva, you can recall I listed Canva as a tool you can use to make your freebie.
The third sample is a screenshot of my blog resource library, it looks warm and a minimalist style.

The images also contain the cover of my freebie but also designed as a mockup instead of just plain freebie cover and I created these images using Photoshop.
If you are a beginner and have no idea on how to use Photoshop, then use Canva, it works perfectly, just use the cover of your freebie.
If you know how to use the Elementor page builder properly, then you can create your resource library yourself.
PS: But, if you have no idea on how to build a resource library, click the button below, sign up to my newsletter and, you will receive a one page PDF as mail from me, download and unzip the files.
You will get three different WordPress resource library page templates designed exactly like the freebie resource library examples that I showed you above.
Step: How to import a new template to Elementor
This step, we will add those WordPress freebies library page Templates you received from me to Your Elementor Page Builder on your Blog.
When you sign up to my newsletter, you will receive a one-page PDF and it contains 3 different resource library pages templates.
i) You will get a J.son file for each resource library page examples we listed above. They are named properly.
ii) Go to your WordPress dashboard, click on Elementor (Templates), click on add new templates, upload j.son file and save.
Example; WordPress dashboard > ELementor Templates> Add new>Upload the J.son and save.
Repeat the same process for each template until you upload all three of them and an extra header template I created which makes it a total of four templates.
NOTE: If you are done with Step two, that is creating, naming and properly setting up your page as listed in step number two, you also imported your free resource library page templates from me.
Now let’s go down to step number four, which is Building and editing your resource library templates you received from me to suit your brand style.
Step Four: How to Build and Edit your WordPress freebie resource Library with Elementor Page Builder;
Return to the new freebie page you created in Step two, click on edit with Elementor and you will get a blank page with building elements from Elememtor;
Here we will create a WordPress resource library page in Elementor, that looks like mine and another with two buttons.
i) Click on the icon for templates, then you click on my templates, you will see those templates we uploaded, click on resource library template 1.
Note: You will a screen message asking if you would like to override the previous settings we made when creating the page in step two, please click on No and give it a few minutes and your template will be imported.
ii) Click on any of the spaces for images, upload your images for each freebie.
iii) Click on the button area, add your Call to Action, an example of a call to action is DOWNLOAD Freebie.
Get the shareable link from the freebie you uploaded to your Google Drive or any other cloud storage where you upload your freebie.
This will enable your readers to get access to a downloadable file once they click on the button you have created.
iv) The second button is for adding a read blog post button to your freebie, edit the button and add a link to your blog post and click on save.
V) Click on the Update button, this makes changes to the page.
v) Repeat the same process for each freebie and if you have exhausted those pre-made elements, just duplicate the section.
B) How to Create a WordPress Resource Library with Images Part II (my blog resource library design).
i) Click on the icon for templates, click on my templates, you will see those templates we uploaded, click on resource library template.
Note: There will be a screen message asking if you would like to override the previous settings we made when we created the page in step two, please click on No. Give it a few minutes and your template will be imported.
ii) Click on the image icon and upload your images for each freebie.
iii) Tap on the button icon and name it using add your call-to-action, for example, DOWNLOAD is a call to action.
iv) Get the shareable Url of your freebie after uploading your freebie to Google Drive or any other cloud storage.
v) Click on Update.
vi) Repeat the same process for all freebies and your freebie library is ready and congratulations, you just finished creating your resource library.
How to Connect Your WordPress Resource Library to an Opt-in Form;
The purpose of creating a resource library may be to grow your email list while serving your special readers something, if this isn’t the case, then there is no need making it a password protected page.
So let’s add an opt-in form, an opt-in form will allow you to deliver the password to your freebie resource library page to your audience right in their email box.
1. Go to your email marketing software, I use Flodesk (Use this link and get 50% discount forever) and Mailmunch on my blog, create a pop-up form and set your form to pop up a few seconds immediately a visitor lands on that page.
2. Add a rule that allows the pop-up to show when someone lands on the page with the same URL.
3. Also, create an auto-responder (an automatic welcome mail with the password to your freebie resource library included in the welcome email).
4. After creating auto-responder, connect the auto-responder to the opt-in form, when creating your form in your email marketing software, click on save and test if it’s working.
Ps: The goal will be that your form pops up immediately, your visitor subscribers and you give them the password as an email.
Final Thoughts on Creating Freebie Resource Library in WordPress:
If you want to create a Free WordPress resource library without using any page builder plugin, the video below will guide you on how to create a resource library in WordPress without Elementor Page builder.
Also, don’t forget, you can save yourself the whole hassles of building from scratch when you signup to my newsletter and grab the free resource library templates.
Related Post: Do you want more useful blogging tips? Read Blog Posts
13 Common Blogging Mistakes Beginners Make (How to fix them)
How to Create a Blog Media Kit and Pitch to Brands (Free Media kit Template)
How to Create Multiple Pinterest Pins and Grow Your Blog Traffic (Free Templates +full Guide)
Blog Growth Hack: 10-Ways to Grow Your Blog in 2020
If you have any questions or need any assistance in creating your resource library, please leave your question in the comment section and if you already have a resource library, how did you create it?
Pin this image for later


I have a resource library that I rather new. These are great tips for me, however, and I am heading over there to tweak it some. It was fun to create and I think it looks great, but you’ve inspired me to improve on it. Plus, market more for my email list.
Hi, Jenny, I am glad you found this helpful. A resource library for me is like a goldmine
Great advice! I currently only have one freebie available, so it’s been easy. However, moving forward – if I have multiple, I’ll definitely use this approach!
Oh, Britt, that’s how i felt when i had just one freebie but you may not even know when you will have a bunch of them.
Wow! This is great information-thank you! I will definitely be referring to this as there are many things about WordPress, being a blogger, email lists, all sorts of things I don’t fully understand yet. This post is so helpful! ♥️
You are welcome. Blogging is complex, just take it one at a time Laura…
Thanks a lot for this guide!
You are welcome Robby
Thank you so much, Faith. I have been n your blog for days, learning. God bles you for your efforts!
I want to as two questions…
Is there a software or app fr designing the freebie itself (content) or is it canva?
Kindly explain the JSON stuff, cant seem to get a hang of it… is it exclusively meant for elementor freebies?
Hello Onyinye, you are welcome and thank you for your kind words.
1) The type of software you need to create a freebie is totally dependent on your audience, freebie type and what you intend creating. Personally, most of my freebie was designed on Canva, read this blog post to learn how to create an irresistible freebie (https://faithola.com/how-to-create-a-lead-magnet/ ) the Json file is an already pre-build page I designed using Elementor, all you need to do to customize it and include a page like that is listed in this blog post, just watch the videos above, also you just have to install the Elementor plugin, create a new page and test it out… I hope this answers your questions, let me know if you need anything else.