
Do you know half of Canva features or some crazy Canva tips and tricks that can help you create beautiful, strategic designs for your business 2x faster?
But, you can end up wasting your precious time trying to create a design on Canva, if you don’t know simple shortcuts, Canva tips and tricks for creating and using Canva.
Millions of small business owners use Canva to create stunning graphics for their businesses.
I love Canva and use Canva to create beautiful, strategic Graphic designs for my business. I believe Canva is a gem!
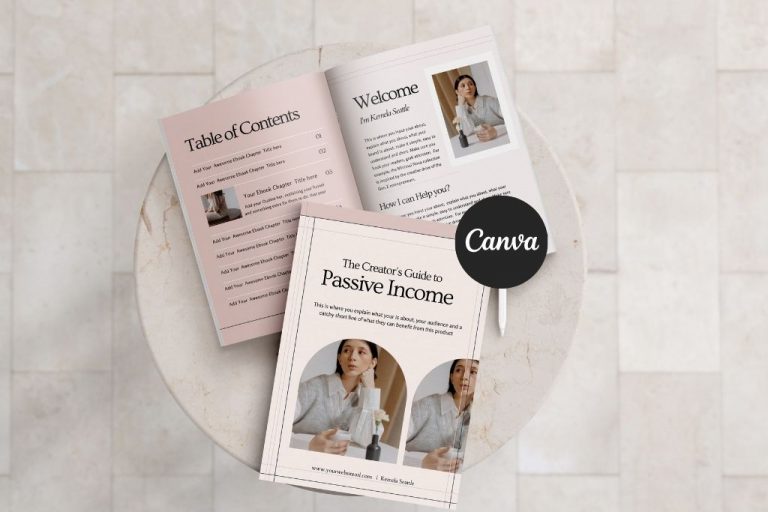
As a business owner and Canva Template designer, I have helped clients create lead magnets, ebooks, course workbooks, slide decks to grow their email lists and create their courses and digital products.
Also, I help clients in service-based businesses to create client experience templates, such as clients welcome packets, pricing guides and Goodbye packets Canva templates.
These are a bit of what you can do with Canva. You can create posters, business cards, thank you cards, invoices, product labels, social media posts, Pinterest, and the latest, websites with Canva.
Creating with Canva means having a design world with endless possibilities.
As business owners who want to spend less time working with maximum output. It can get a bit tricky creating stunning designs for your business without spending so much time moving from elements to elements, tab to tab, image to image on Canva.
So, in this Canva Guide, we will cover;
50+ Canva Tips and Tricks + Canva features for creating better designs.
These are Canva tips for beginners and non-beginners (intermediate or expert users) on how to effectively use Canva to create scroll stopping designs.
Note: This post may contain affiliate links, and I will earn a commission which I use in running this blog if you buy with my link. This won’t attract an extra cost to you. Read my Disclaimer policy here
1 | What is Canva
Canva is an online Graphic design software with a mission to empower the world to design anything and publish anywhere. Canva was launched in 2013 by Melanie Perkins and her partners.
The goal of using Canva for most people is to create their brand assets and Graphics quicker, even when they are not designers themselves.
One of Canva’s goals is to make quality designs accessible to all, and they have lived up to their Words.
In short, Canva is empowering millions of people and businesses around the worth with the ability to create stunning designs, even when they are non-designers and at an affordable rate.
Canva has a few plans, Canva for Free, Canva Pro (a popular plan for small business owners), Canva for non-profits, and Canva for education.
So, we will compare the most popular plans, Canva freemium and Canva pro.
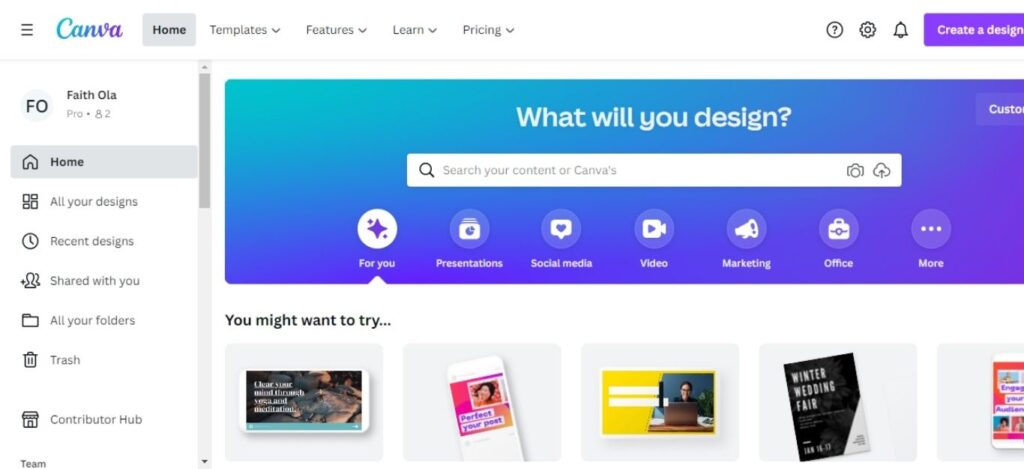
2 | Canva Free Vs Canva Pro
Canva gives access to millions of Graphic design assets, elements, stock photos, mind-blowing tools for free in their freemium plan.
Hence Canva has a free-for-life Plan.
While Canva Pro is a Canva subscription plan that costs $12.99 monthly and $9.99 per month/annual subscription plan.
Canva for free is great, but Canva pro is awesome!!!
I have been using Canva Pro since 2018, and I have never looked back.
Compared to Canva Freemium, Canva pro includes access to millions of stock photos, brand kit, Magic Resize tool, Content Planner, Design and Photo folders, Canva Animator, Teams and real-time collaboration, 100 GB Storage, Integration with other tools, such as Mailchimp, Smart Mockup and Canva Background Remover (The ability to Remove Background from an image in one click).
However, if you are new to Canva, you can use Canva pro-30-days free trial, navigate, and learn how to use Canva.
Canva is super easy to use, and with these 50 plus best Canva Guide, Canva tips and tricks, you’ll learn how to use Canva effectively for your business.
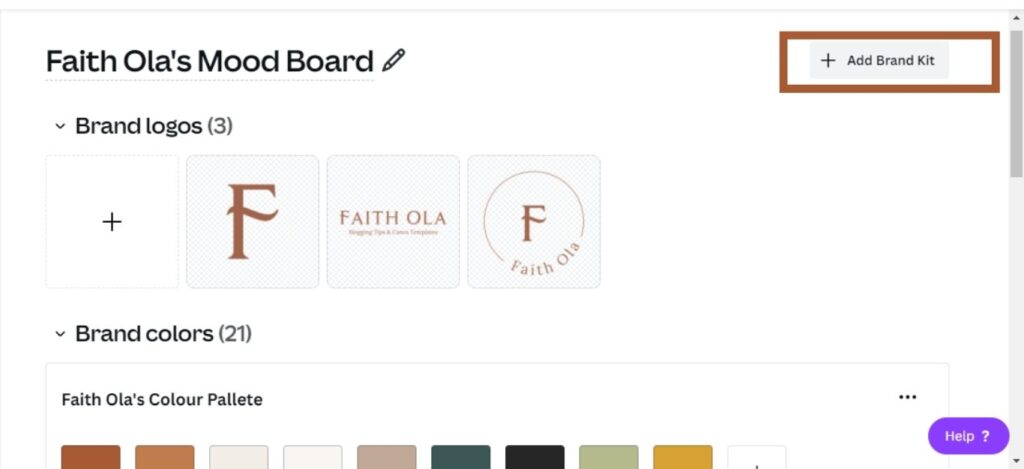
3 | Canva Brand Kit
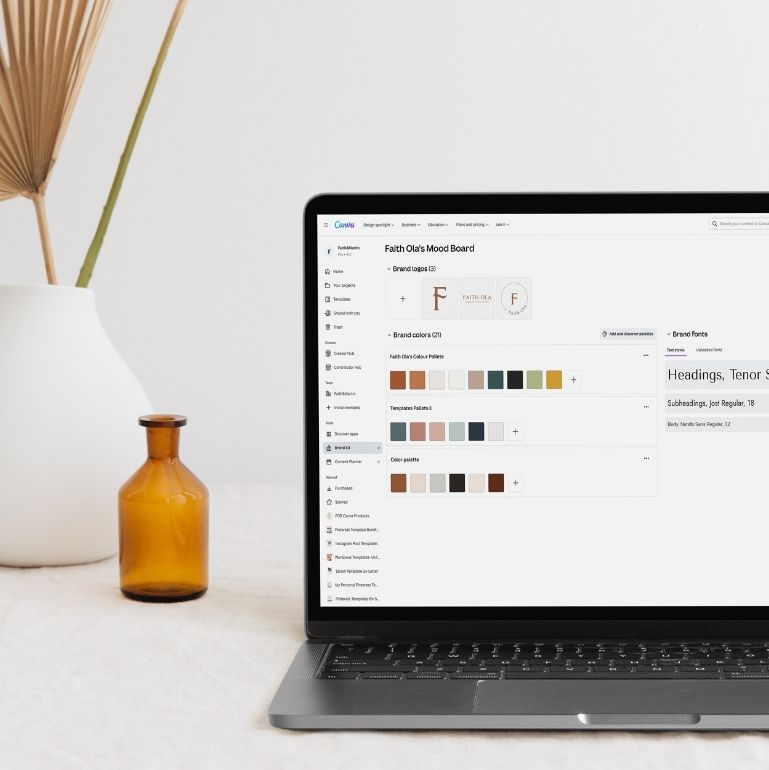
One of the best Canva hacks I learned when I started was using the Canva Brand kit. It’s such a time saver!
Canva Pro users can upload their Business Brand Kit.
When you upload your brand kit to Canva, you’ll have your logo, upload your fonts to Canva, colours pallets in Canva always. Brand kits help you save time and create on-brand designs.
To access and upload your brand kit to Canva – Go to your Canva homepage, navigate to the left side tools panel, scroll to where you have Brand Kit, click on Brand kit and upload your logo, fonts and colour palettes.
Do Note: Uploading your Brand Kit in Canva will save you time and help you create cohesive, on-brand designs. Learning about the Canva brand kit is one Canva tip I love.
4 | Create Different Design Format in Canva
Canva has a wide range of Design formats, from baby shower invitations, presentations, ebooks, workbooks, Instagram, Facebook, Pinterest, canvas prints, brochures, infographics, menus, desktop prototypes etc.
The options and what to create with Canva is endless. You can find different popular design formats on Canva Create Page.
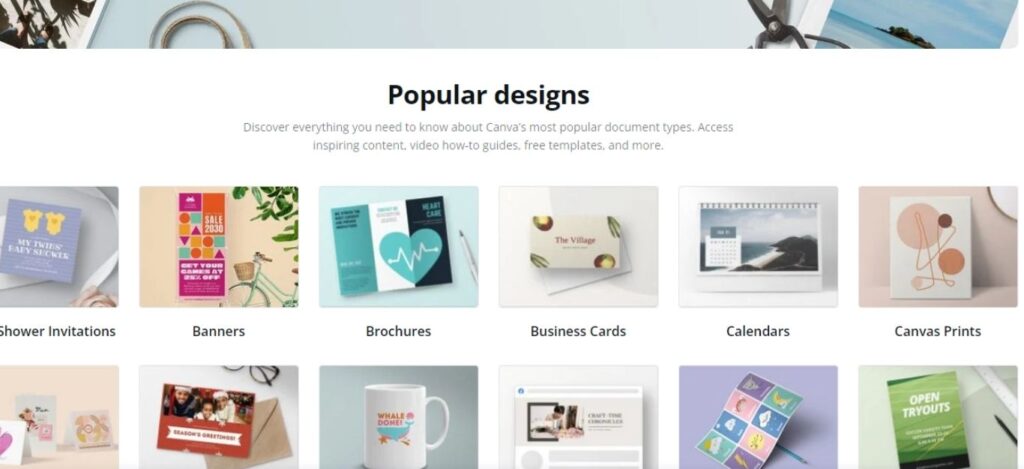
A simple Canva trick to get resources and guide you will need to create or customize a Canva design format is checking the Landing page for that design format.
For Example, If you want to create a Facebook post, ad or banner, and you want a Canva guide “on how to create and customize an effective Facebook post”.
Go to Canva Create Page, click on Facebook, and you will find all the Canva tips you’ll need to make an Effective post.
5 | Create and Download Multiple File Types in Canva
One Important feature of Canva is design flexibility and the ease of creating multiple file types with a single design. After creating or customizing a design in Canva, you can choose to download them as multiple file types.
Downloading a design as a multiple file type on Canva is different from resizing a Canva Design (we’ll learn about resizing later in this Canva guide).
Multiple file types for Images include PNG, JPG, GIFs (when you add animations to your designs).
These works best for bloggers, influencers, or anyone who wants to repurpose a single Canva design.
For worksheets, planners, ebooks and workbooks, letterheads, you can download your design as PDF Standard (small size, multiple-page documents) or PDF Print (High-quality multiple page documents).
As a blogger and business owner, I need mock-ups for presentations, especially when presenting my Canva Templates.
A Canva hack I use for creating product mockups is downloading a few pages (especially, the cover page) as an Image (PNG or Jpg), and I use it to create a beautiful product mockup in Canva.
Other Multiple Files Types on Canva are SVG (Sharp Vector Graphics), MP4 Video and GIF.
Some important Multiple File Types available only on Canva pro are Transparent Backgrounds (perfect for creating and downloading Logos).
And Compress File (this file type helps to reduce image quality, size and this is perfect for blog post images).


6 | Use Canva Design Insight Tool
In December 2021, Canva launched the Design insight tool, where you can view the live statistics of your design.
With the Canva Insight tool: when you share your Canva Design, either using a shareable link or the Canva Content Scheduler, you can see your design Unique views, Views, Viewers (name and last viewed), engagements and reactions (if shared on social media).
To check your design insight, open your design and in the design editor, navigate to the top bar of Canva editor where you have document title, Share, a Graph (insight), and Download tabs.
Now, click on the insight tool (Graph icon) beside the Download tab, and your design insight will pop up.
Note: to see your design statistics, share your Canva design using a Canva shareable link or content scheduler.

7 | Use Canva Magic Resize Tool
One important Canva tip and trick is using the Canva Magic Resize tool. Canva Magic Resize tool is a time saver.
You can create similar designs for different document types by resizing and rearranging the elements in the design.
For example: Resize an Instagram post to an Instagram story template or an Us letter size document to an A4 size document.
As a Canva template designer, I find the Magic Resize tool helpful, and it saves me lots of time.
To use the Canva Magic Resize tool, navigate to the top bar of your Canva Design Editor, where you have the Home Tab, File, Resize. Click on the Resize tab, and more features will pop, search for your new template size, or add a custom size.
After choosing the new size, click on resize button (to resize the same design without a copy) Copy and Resize (it will create a copy of your design with new size).

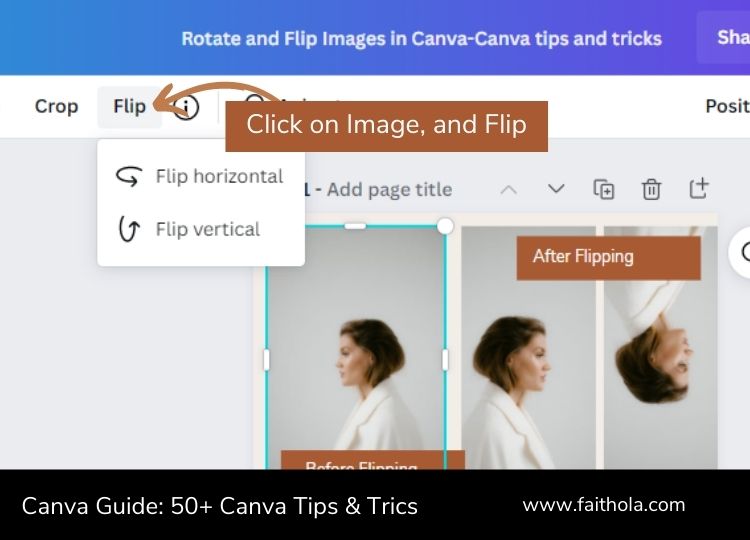
8 | Rotate and Flip Images in Canva
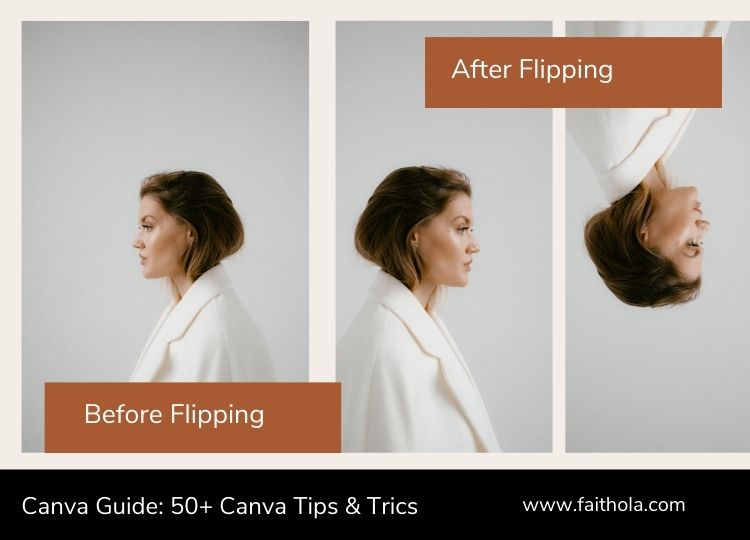
One simple Canva trick for adjusting an Image when creating a design is flipping or rotating the image horizontally or vertically.
To flip an image in Canva, click on the image, navigate to the top bar of Canva Design editor, where you’ll find the Edit image, Crop, and flip tab.
Now click on Flip, and you’ll find the options of flipping horizontally or vertically, click on any of those options.
9 | Canva Uppercase Tool
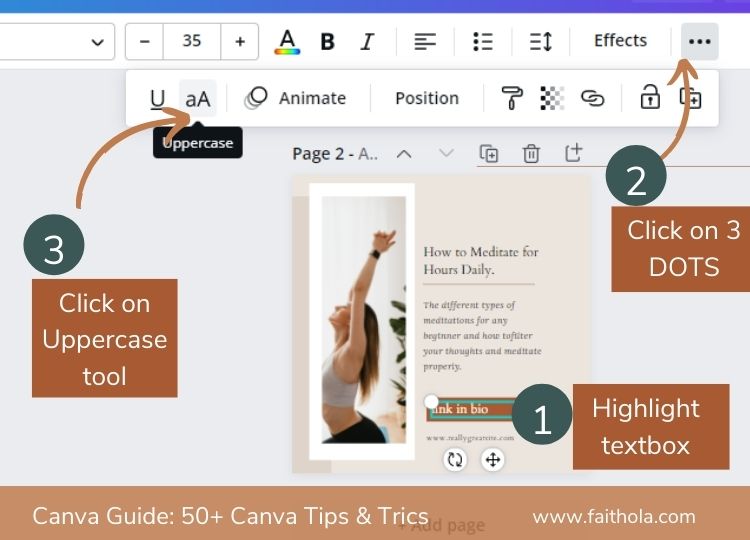
The Canva Uppsercase tool helps you change all text from lowercase to uppercase. This tool will help you save time, and it’s useful when designing templates you want to share with others as it makes customizing in Canva easier.
To use the Canva Uppercase tool, click on the textbox, navigate to the top toolbar in Canva Editor, where you have the text formatting tools. Now, click on the three Dots beside Effect.
When you click on the three dots, more tools will pop up, click on the “aA” tab next to Underline, and all the text in that textbox will become uppercase. Click on the same tab again to change from uppercase to lowercase.
10 | Add a Hyperlink in Canva
An important Canva hack I learnt early is creating Sales pages, upsell and Downsell Pages, pricing guides, and call to action pages when creating an ebook, Workbook or Client Welcome Packets in Canva.
You can add a hyperlink to your PDF, videos, presentation slides In Canva.
Adding a hyperlink to your designs in Canva can help you make money by directing people to affiliate products, promoting your products in your Canva design. Learn the simple steps for adding hyperlinks to your designs in Canva.
11 | Organise Designs and Images with Folders in Canva
If you love to organize your designs and make them easily accessible. Then this Canva tip will work magic for you.
Organize your designs, sort stock images and create collections using Canva Folders.
I love this feature because it helps me keep things tidy, and the Canva folder comes in handy when I’m sorting new images to use in designing a Canva template.
Also, I use folders to group the templates I create for sale, templates I create for personal use, PDF links for my customers, even folders for my templates as a Canva Creator.
To use the Canva folder feature, you need a Canva Pro account, and you’re not sure if you need Canva pro, use Canva pro on a 30-days free trial.
Now you have Canva Pro, navigate to the left side toolbar in your Canva Editor, click on ‘folders‘ and create a folder.
After creating a folder, you can add designs to your folder.
Easy Steps for Moving Your Designs to Folders
Navigate to your designs in the Canva Home page without clicking on the design, right-click on the three dots at the top right of the design.
A list of tabs will pop up, click ‘move to folder’, and you can move your designs or images to an existing folder or create a new folder.
12 | Use Canva Brand Codes
Canva brand code helps you search for elements, templates and images curated by the same designer.
The Canva brand codes help you maintain consistency and if brand consistency is important to you.
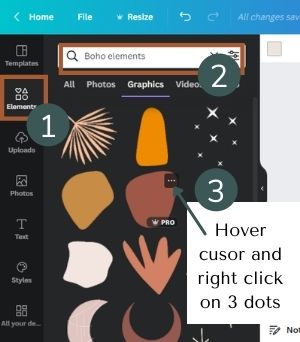
In the element tab, find the Element you like, hover your cursor around the Element, and right-click on the three dots that will appear at the top right side of the Element, and a new window with more information such as the designer’s name, keywords will pop.
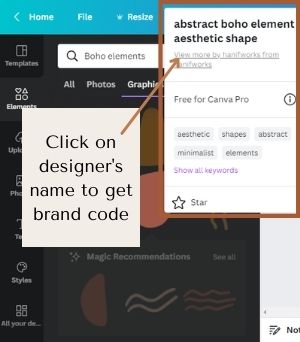
Now, click on view more by “designer’s name” and more elements curated by the designer will appear in the search. You can copy the designer’s brand code and take notes for future reference.
Note: you can use Canva Brand codes to search for images, elements and templates by a designer.

13 | Find Canva Creators Template Collection
Do you know you can find Canva template collections and more beautiful templates by a designer you already like their designs on Canva?
The first step is clicking on a Canva template you like in Canva. Find, and copy, their Canva brand codes (I have shown you how to find brand codes in the Canva tip above).
Return to the Canva homepage and paste the Canva brand code in the search bar on Canva’s homepage, and more templates by the same creator will show up.
So, you have lots of templates by a Canva creator on your screen. Hover around a template and click on the three dots, and a new window will show up.
You’ll see the title of the Canva template, the designer or the brand name (by Faithola). Go ahead and click on the designer’s name, and voila!
You are in Canva’s creator’s profile, where you will find assortments of templates by that Canva template designer.
14 | Follow Canva Creators
After searching for a Canva Creator’s profile, you should follow the Canva Creator, using the follow button on their profile.
Canva is yet to have an easy way to see a list of Canva creators you follow.
Update: Yyou can now see the list of creators you follow in Canva
However, for future references, copy the Canva Creator’s profile Url, and keep notes of the URL.
For Example, You can follow me on Canva, and my Canva Creator’s profile URL is canva.com/p/faithola

15 | Use Free Canva Device Mockup
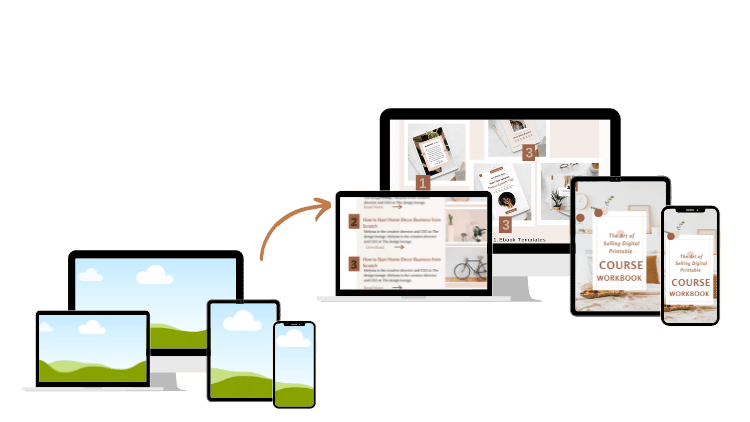
The Canva device mockup is handy when promoting your lead magnets, freebies, online courses, digital products and services.
To find Free Canva Device Mockup, select Elements from your left sidebar menu toolbar, click on Frames and now click on “See all”.
There, you’ll find assortments of mockup frames for laptop, desktop, phone, and tablet. Click on the mockup device to add it to your design, and drag and drop a photo inside the frame.
Pro Canva Tip for Creating Mockup in Canva:
One simple Canva tip and trick I use is to download a few pages of your designs as PNG, upload the images to Canva and add them to your mock-up, instead of using and picture. This Canva tip works best for promoting your ebook, lead magnets, Freebies, courses etc.
16 | Search and Filter Elements in Canva
Searching and filtering elements in Canva is tiring when you don’t know some simple Canva tips and tricks for searching and filtering elements on Canva.
However, here is a simple Canva Guide for sorting, searching and filtering elements on Canva.
To sort Canva Elements, navigate to the element tab, refer to the elements search bar on top and type in a keyword.
Click on the toggle icon on the right side of the search bar, and filter elements using the options available. You can;
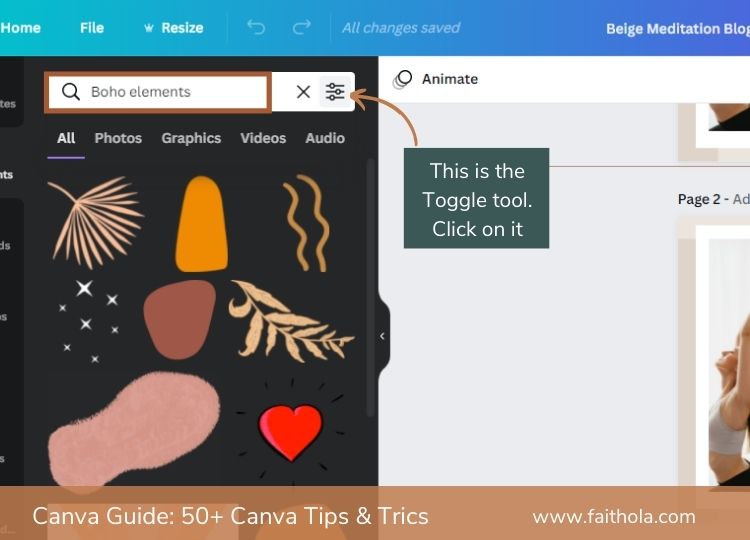
17 | Sort Canva Elements by Free and Pro availability Status
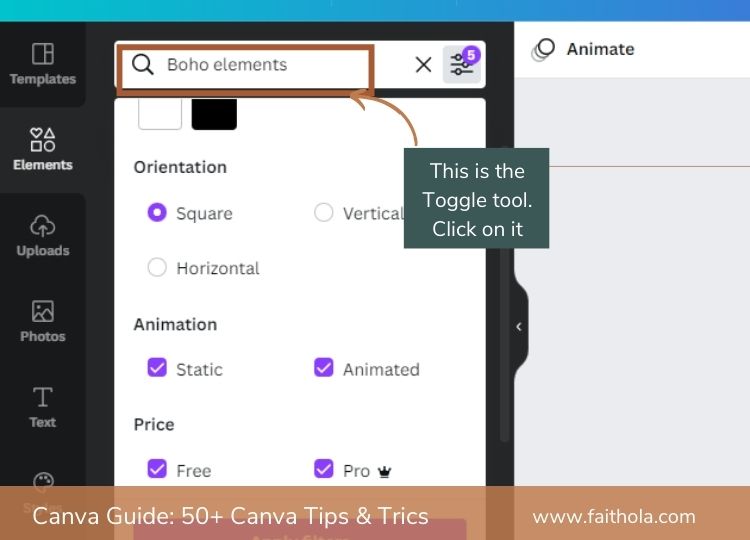
Here, you can filter elements using free or paid status.
Sorting elements using free, and pro status helps you save time, and if you are a free Canva user, you don’t want to include pro elements in your designs, if you don’t want to make payments before downloading your designs.
I use Canva Pro, it’s a lifesaver, but when designing Canva Templates for Sale.
I use only free elements, so those buying my templates won’t have to pay for the pro elements in the design.
18 | Sort Canva Elements by Static or Animation
Sort elements in Canva by static or animated status by checking the boxes after using the toggle tool. This helps to narrow down your search and saves you a lot of time.
This is not a Canva for beginners tip alone, but also for pro users who don’t use this Canva feature often and spend so much time searching for Canva elements.
19 | Sort Canva Elements by Orientation (Square, Vertical and Horizontal).
Sort designs using the Canva elements search feature by ticking any Canva element search features or combining more than one feature and clicking on Apply filters.
For Example, I search for Boho lines in Canva Elements, and I tick Free, static and horizontal and click on apply features.
20 | Filter Images and Elements in Canva by Colour
A Canva for beginners tip I learnt that changed how I search for images and elements for a design is the Canva Colour search feature.
In your Canva design editor, navigate to the elements or image search bar, and type in a keyword to find even more specific Canva elements and images.
Click on the toggle icon at the top right of your elements or images search bar, and a tool panel with more search features will open up. Choose any colour or click on the plus sign to add custom colour codes.
21 | Filter Fonts Search in Canva
An aspect of designing that is important is choosing the right font for your designs, and this is why I recommend using your brand board.
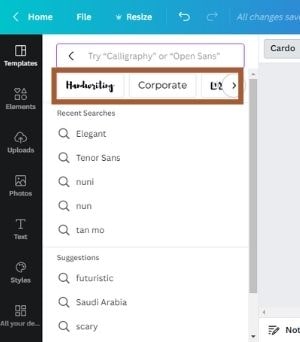
To find fonts on Canva, click or add a textbox to your design, click on the textbox and navigate to the top toolbar where you have font and font size.
Click on the font name at the top toolbar, and the font search bar will open up.
You can search for a font of your choice or use the forward and backward arrows to check for the different font categories. Pick any font category to find more fonts.
For example, if I click on Serif or elegant, Canva will show more fonts in these categories.

22 | Use Canva Info Icon Feature for Advance Search
Do you know that the Info Icon (the icon that looks like the letter I in a circle) is an advanced search feature?
The Canva info feature is mind-blowing, and it is a game-changer.
When I discovered this search Canva hack, it became easier to find collections of similar elements, images on Canva.
With the Canva info icon, you can find similar designs, Canva images collections, elements creator etc.
To use the Canva Info feature, click on an image or element in a design and navigate to the top toolbar where you have Edit Image, Crop, Flip, Info Icon ( letter “I” in a circle), and Animate.
Click on the Info icon, and the element or image title, keywords, designer or photographer’s name window will pop. Click on any of these options to find similar elements, collections etc.
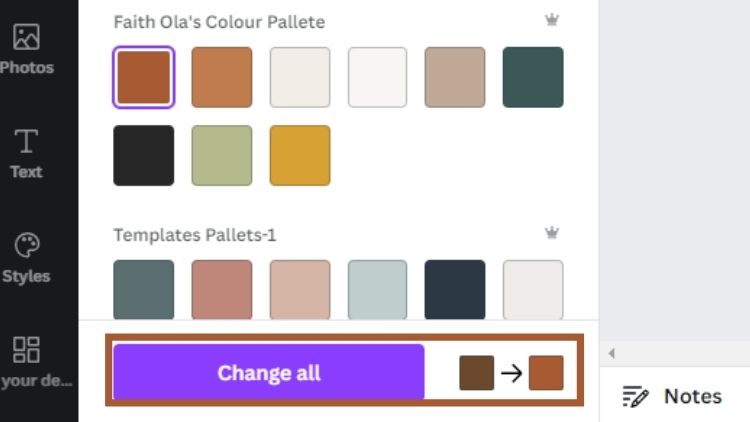
23 | Change all Colours in a Canva Design with a Single Click
Canva “Change all” feature helps you to save time, especially if you are customizing a Canva template or creating a design with lots of pages.
With the Canva change all feature, you can change colours across different pages of your designs with a single click.
To change all colours with a single click on Canva, select an element in the design (for example, rectangle, text, line, etc.), and a colour editor toolbar will appear where you can change the colour.
Click on a new colour of your choice, and then a checkbox option with a forward arrow will pop up at the bottom of the colour editor side panel, which says ‘Change all’.
When you check the box, it will change all elements from the old colour to the new colour. isn’t this feature awesome and a time saver?
24 | Lock Elements or Images in Canva
You can lock elements in place when creating a design in Canva. This is helpful when creating designs with lots of layers, and you don’t want to delete any elements accidentally.
Also, locking elements in Canva is helpful if you want to share a Canva design, but you don’t want some parts of your designs to be editable.
To lock an element or image in Canva, click on the element, navigate and click on the padlock symbol at the top right toolbar and your design will be locked.

25 | Group Elements in Canva
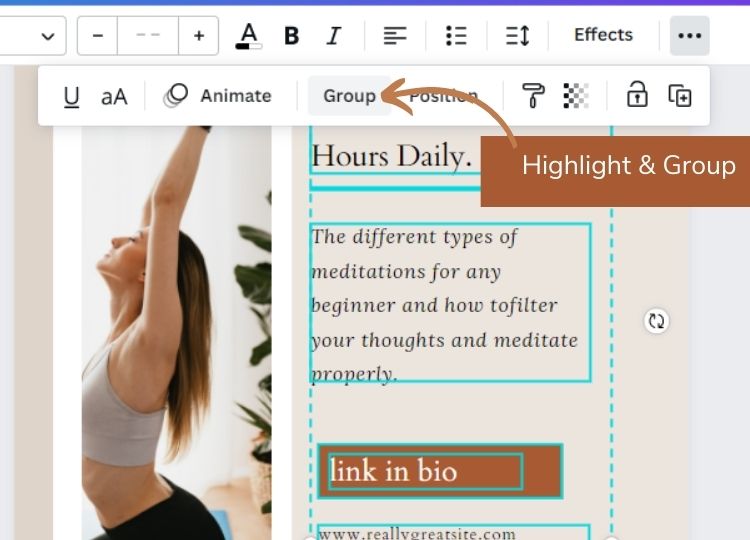
Grouping elements in Canva helps you move, edit, copy and delete multiple elements at once.
Also, this is a Canva hack I use to keep my Canva template designs organised and easily editable.
I group headings and paragraphs, which helps buyers easily customize Canva templates from our Canva template shop.
To group elements, select the elements by dragging your cursor over the elements or click on an “element + shift” on your keyboard until you highlight all elements you want to group.
Now, click on Group from the top right side of the toolbar or use the keyboard shortcut for grouping Canva elements (Command + G).
26 | ALT + Drag to Scale Proportionally
Scaling designs proportionally can be a chore, and I spent valuable time trying to get elements in my Canva designs to have similar sizes.
Example. You want to add social media icons to your Canva design, and you want them to be the same size.
So, to scale your design, highlight the elements you want to scale, click on “ALT” on your keyboard and drag the edges to reduce or increase the size of the elements simultaneously.
27 | Use Frames to Customize Images in Canva
A common Canva for beginners tip or one easy Canva guide anyone figures out easily is how to add images in frames and shapes like Circle, squares and many other Canva frames added to the Canva library.
To insert an image to a Frame in Canva, click on the elements tab in the Canva left side tool panel. Scroll down a bit and click on frames or grid. Choose any frame, and it will be added to your design.
Find an image in the Canva library, or select and upload an image from your computer. Drag the image over the frame, and your image will take the frame shape.
28 | Use Canva Ultra Minimal Frames
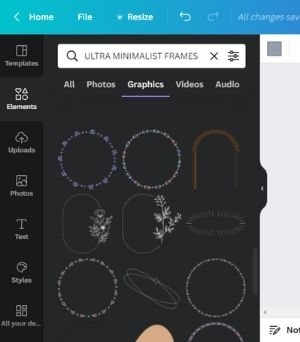
Aside from the basic frames, you find on Canva, Canva has a library of beautiful ultra-minimalist elements and frames, especially if you are a Canva Pro User.
Search for “Ultra minimalist Frames” in your Canva elements search bar, and you’ll find assortments of Canva Frames.

29 | Use Canva Photo and Image Editor
Uploading your images to Canva or accessing millions of premium images in the Canva library is no longer a Canva for beginners tips because it is so easy to use.,
However, do you know you can edit your images directly in Canva?
You can use presets, create photo fillers, blur images, crop images, remove background from an image in Canva with a click.
To use the Canva photo and image editor, highlight the image you want to edit, refer to the top left toolbar and click on Edit Image. The Canva photo and image editor window will open up, and you will find more photo editing features and tools.
30 | Create and Edit Videos with Canva Video editor
Canva recently launched its video Editor. Edit your videos on any device, whether a computer, tablet, or mobile device.
Canva video editor allows you to create videos for social media (Instagram reels, Tiktock, Facebook), Training, Explainer, How-to Videos, product promo videos.
Additionally, you have access to free stock videos, animations, illustrations, Icons etc.
31 | Create Animations and Gifs with Canva
Nowadays, it’s becoming difficult to stick to creating only static images and marketing materials for your business with trendy social media platforms and features such Tiktok, Facebook, Pinterest video pin, Youtube shorts and Instagram reels.
Animations and Gifs will help you uplevel your design game and create scroll stopping Canva Graphics.
For Canva Animations, you can choose to animate an element on a page or animate the entire page.
Highlight the element, or page you want to animate, navigate to the top toolbar, click on animate, and select any Canva animation option.
While animating a textbox in Canva – click on the text, and refer to the right side of the top Canva toolbar where you the font editing options, click on the Three dots feature and an extra toolbar will pop up, click on animate.
Select any font animation, play around with it until you find a font animation you like.
Also, to add stickers to your Canva designs, type “animation stickers”, in the search box of the Elements tab and select any sticker of your choice.

32 | Use Canva print Bleed for Printables
Do you know how to use the Canva print bleeds, or are you making this Canva for beginners mistakes?
Well, don’t beat yourself, because I made them too.
A useful Canva hack I learned when I started creating templates for Canva Native library is how to use the Canva print bleed feature.
The Canva print bleed is important when creating printables like Ebooks, workbooks, planners, gift cards, wedding invites business cards etc.
To use the Canva print bleed, refer to the File tab, where you have Home, Resize and click on File.
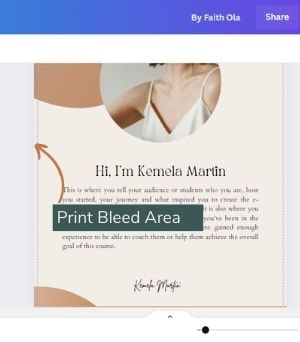
A new tool window with more options will pop up, click on print bleed, and a squarelike-shape will appear around your designs.
Drag all elements that touch the edge of the designs across the print bleed (square-like shape around your Canva design).
However, do note; when design elements touch the print bleed area, you will experience difficulty during printing.
ALSO READ: How to Create Stunning Ebooks in Canva (+Free Ebook Templates)

33 | Print With Canva
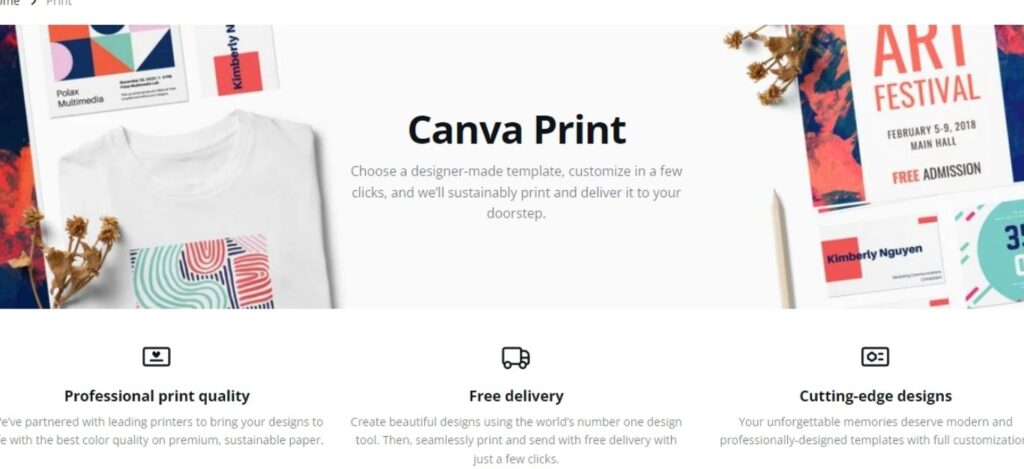
In 2021, Canva added the option of printing with Canva. Print with Canva allows you to print designs you create in Canva.
Canva designs such as; Planners, business cards, postcards, t-shirts and mug designs via Canva printing companies and have them delivered to you.
Although, the Canva print feature is currently limited to selected regions.
Check out if Canva Print is available in your location, and learn more about Canva print here.
34 | Create Gradient Background in Canva
Applying gradients to your Canva design can make them look eye-catchy and outstanding.
A gradient is a gradual blend of two or more colours or between two tints of the same colour.
An example of Gradient is a Facebook post design I created in Canva and currently promoted in the Canva pro library is a gradient and a blend of pink and teal colours.
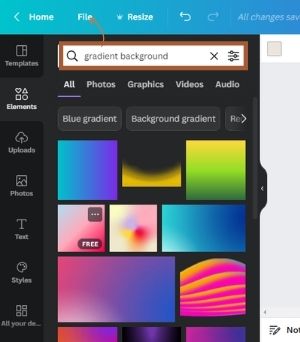
To add a gradient background to your design in Canva. Search for Gradient in the Canva elements tab, select any gradient of your choice.
After choosing a Gradient in the Canva element tab, apply the Gradient to your design and increase the gradient element size until it covers your design background.
Pro Canva Tips & Tricks for Creating Gradient background in Canva
If you want to create a gradient background design with specific colours in Canva.
You should check if the colours of the gradient element are editable by clicking on it and checking the Canva colour tool.
Finally, edit and adjust gradient colours.

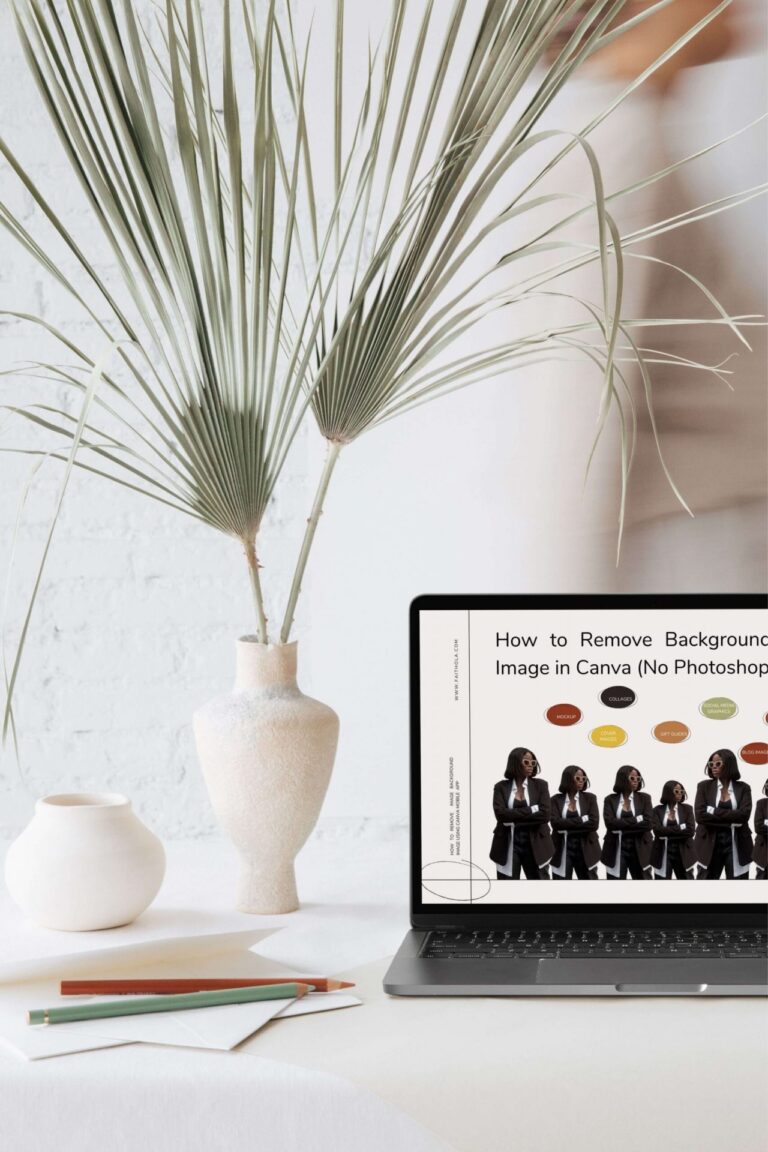
35 | Remove Background From an Image in Canva
One commonly searched Canva feature by beginners, or maybe pros are “how to remove background from an image in Canva“, AKA creating images with no background.
An example is Logo designs on Canva.
To remove background from an image in Canva with a Click using the Canva Background Remover, you need a Canva Pro account (Try Canva pro for free for 30-days).
READ TUTORIAL: How to remove background from an image in Canva in 2-minutes, and no photoshop required.

36 | Create Transparent Background in Canva
A simple Canva tip for creating and blending the background of images in Canva is using the Transparent tool in Canva.
You can use the Canva transparent tool to adjust the colours of an element or make an image less visible in a design.
To make an element or image transparent in Canva, click to highlight the element or image, and navigate to the top right Canva toolbar where you have these tools Position, Paint roller, Transparent and Link.
Click on the transparency tool (mat-like tool between paint roller and link tool) and adjust the transparency of your element.
Do note- Transparency ranges from 0-100 in Canva.
37 | Use the Canva Paint Roller Tool
The Canva paint roller tool helps you copy styles from one text, element or image to another.
I find the Canva paint roller tool super handy, and It’s a Canva trick I love using.
Copy styles from one design to another by clicking to highlight the element or text you want to copy styles and navigate to the top right side of the Canva toolbar.
Click on the Paint roller icon (it’s between Position and Transparency tools), and click on the Canva Element or textbox to paste the style you copied.


38 | Use the Canva Text Effects
Create designs that jump off the screen with the Canva Texts Effect.
Add text effects to your designs in Canva using two simple methods.
The first method is to click to highlight the textbox and click on effect in the textbox toolbar, and the Canva Effects Window will pop open.
Select any text effect of your choice from the multiple text effects option, such as curving your text, adding shadow to your text, Neon etc.
The second method for adding text effect in Canva is to click on the Text Tab in the Canva tool panel, scroll and select, and apply text effect to your design.
39 | Add Shadow Effects in Canva
Adding shadows to your images in Canva is a game-changer when creating social media graphics and mock-ups for your freebies, ebooks, lead magnet and workbook.
I use the Canva drop shadow to create realistic product mockup images when I don’t want to create mockups in Photoshop.
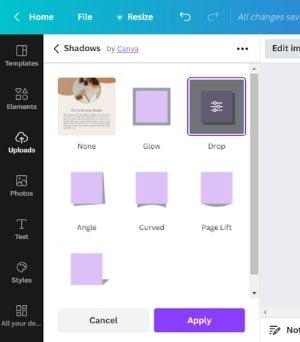
To add shadows to your design, click and highlight the image, navigate to the Canva top toolbar and click Edit Image.
Canva image editor will open up, click on shadows, and more shadow options pop up.
Choose from the options (drop, glow, curved, angle etc.) and adjust, if needed.

40 | Create Your Logo in Canva
Canva has millions of Logo templates to pick from in the Canva library, and this is helpful to small business owners who don’t have the budget to hire a Brand designer.
However, a simple Canva tip on using customizable Logo templates from the Canva library is that you cannot trademark your logo.
Alternatively, if you upload your logo to Canva or design your Logo from scratch using Canva fonts and lines, without using stock content, you can trademark your Logo. Read the Canva’s Logo Trademark Article.
41 | Schedule on Social Media with Canva Content Planner
Canva is becoming the next best thing for small business owners. With Canva’s content planner, you can create a design in Canva, publish it directly to your social media accounts, and you no longer have to switch between apps.
In your Canva editor, without clicking on any design, navigate to the left side where you have “Home, Shared with you, Trash“, scroll down to the Tools section and click on the Content planner tab.
In the content planner editor, click on a new post and a list of your projects (designs) will pop up, choose any of your designs, and schedule using the Canva content planner.
Alternatively, click on the plus sign beside any date in the Canva content planner, and a section with your designs will pop up. Schedule from your projects, or pick any template in Canva’s library.
Use Canva’s content scheduler to schedule your Facebook posts to Facebook Groups and Pages, Instagram (requires a Business Account), Twitter, LinkedIn, Pinterest, Slack and Tumblr.
However, the Canva content planner is available only to Canva pro users. Try Canva pro on a 30-days free trial.
42 | Use Integrated Apps
Canva is fast becoming a vast online design suite and includes several integrated apps and tools available on Canva.
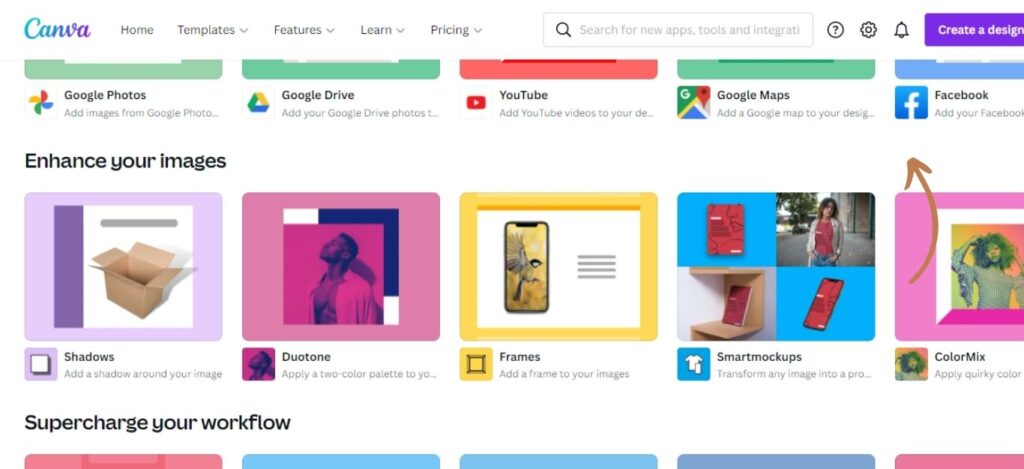
Canva integrates directly with Google Drive, Google photos, Slack, Microsoft Powerpoint, One drive, Asana, Hubspot, Facebook, Instagram, Youtube, Google maps, QR Code, Emoji, Pixabay, Pixels, Typeform etc.
Also, enhance your images in Canva with Duotone, Slice, Shadows, Smart mockup, Colormix, frames etc. Check the list of apps integrated with Canva.
43 | Create and Collaborate with Canva Teams
Canva understands the importance of having teams and real-time collaboration between team members in Canva.
Therefore, with Canva Pro, you can add up to 5 team members, collaborate in real-time, leave comments on designs, add and use the same brand kit to maintain consistency.
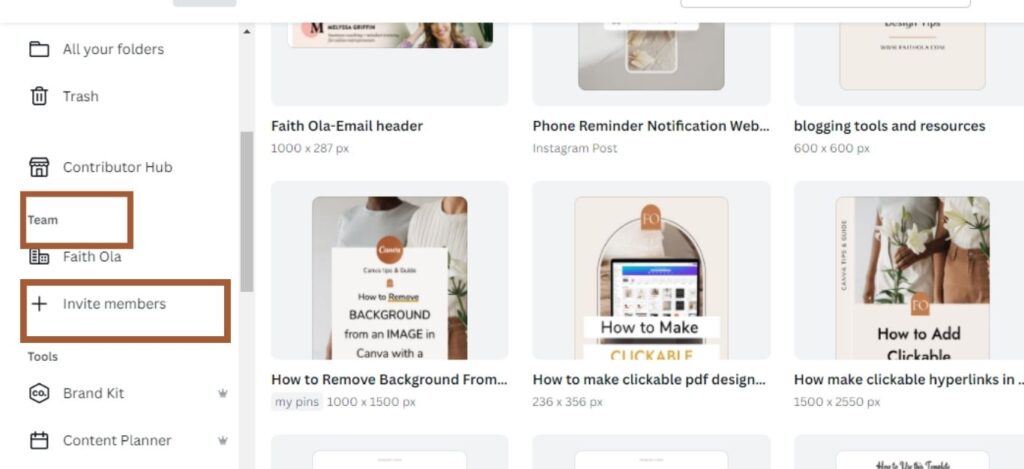
To add a team on Canva, navigate to the left side tabs section and click on Team, and Canva teams editor will pop up, input the email your team member uses for their Canva account and click on Send invitations.
Your incoming team members will join your team in Canva after accepting your invitation via email.
Additionally, to assign roles to members of your Canva Team Members. From your Canva home, refer and click on your brand name under the Team section. You will see more information about your Team.
Scroll down to where you have the names, and email addresses of Canva Team members, click the name of any Team member, and assign any roles (template designer, administrator, member) or remove from teams.
44 | Add Comments to Designs in Canva
Canva Teams allow you to review a design, add comments to a Canva design for a team member to see, and you can text each other back and forth without exiting your Canva design editor.
From your Canva homepage, click on a design shared with you. At the top side of the design, Click on the Comment icon where you have the ‘Delete, add a design and Duplicate tool‘ to add a comment, and any team member with access to the design will see your comment.


45 | See Version History in Canva
Accessing and restoring your design version history in Canva is possible.
Although, a tricky Canva hack because not so many people know about this Canva feature.
Here is a simple Canva guide on how to access and restore your Canva version history;
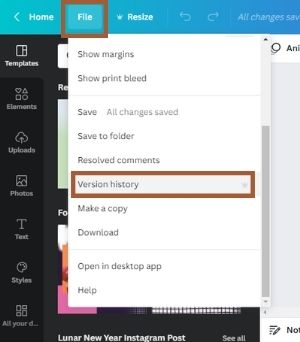
Open the design you want to review its version history in Canva, refer to the top left toolbar and click on File.
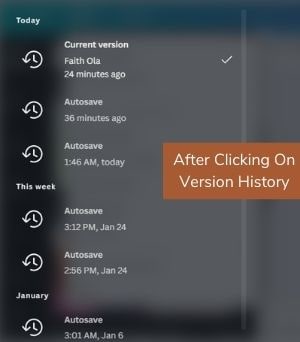
Now scroll down until you see the Version History. Click on version history, review and compare the different versions of your design. Click on the restore button to restore a previous version of your design in Canva.
46 | Canva Guide to Presentation and presenting with Canva
Canva Presentation is one great Canva feature that helps businesses, course creators, and even beginner Canva users to create presentations, present and go live with Canva.
To present in Canva, create your presentation slides using presentation templates from the Canva library, create and design your presentation slides or purchase a custom presentation slide deck.
Some Canva Presentation Guide, tips and tricks;
47 | Create Standard Presentation in Canva
To present with Canva using your Canva presentation slide deck, refer to the right side of the top toolbar and click on the presentation icon next to the three dots.
For standard presentations in Canva, you can present your slides at your own pace.
Use the left and right arrows on the screen or your keyboard to change slides and switch between slides.
Use the icons at the bottom right of your standard presentation window to go live, add notes or check the presenter’s view.
To exist Standard Presentation mode in Canva, click on the ESC button on your keyboard.
48 | Present and Record in Canva
Recording yourself while presenting in Canva is possible, and this feature is a game-changer for course creators, businesses and those who love having tutorials.
There are two ways to access the Canva present and record feature;
i) Click on the present symbol on the right side of the top toolbar and use the drop-down feature, click on present and record.
While the other way to access the Canva present feature is;
ii) Click on the three dots on the right side of the top toolbar and click on present and record.
Go ahead, present and record yourself, and you can share the link with others.

49 | Canva Presentation Shortcuts, Tips and Tricks
When having a presentation directly in Canva, press the following shortcuts on your keyboard for magic effects:
- “ C” key for confetti rain
- “O” Key for floating bubbles
- “D” for a drumroll animation
- Letter Q for quiet
- Letter B to blur the current slide
- Any number for a timer (1 for one minute, 2 for two minutes, etc.)
- Shift + / or ? On your keyboard for opening the Magic Effects menu.
- Press ESC on your keyboard to exit presentation mode
50 | Go Live with Canva
Create interactive sessions with your audience with the Canva live feature.
With the Canva live feature, you can present and engage with your audience in real-time.
Your audience can submit questions and comments directly from their device, while yon can display questions on the screen for them.
To use the Canva live option. In your presentation design editor, navigate to the bottom right and click on the Present full-screen or Ctrl + ALT+ P to view the full screen.
Now click on the Canva Live icon in the bottom right corner and click on Start new session.
You will be given a six-digit code to share with your audience and ask them to go to canva.live (canva.live.cn for those in China) and enter the code to join you.
51 | Add Graphs and Charts Canva presentations
Graphs and charts are important visual elements in presentation, and you can add your data in Canva and have it create your graphs or charts.
All you have to do is embed the graph or chart into your presentation.
Another way to add charts is by adding them directly in your Canva design editor.
In the Elements section, search for the name or the type of chart, and click to add the chart to your presentation.
52 | Share Canva Presentation as Full-Screen Websites
With Canva presentations and Canva website options, you can your presentation as a website.
Sharing your Canva presentation as a website means you don’t have to share editable links with others if you give access to your designs, and they do not need to log in to Canva to view your presentation.
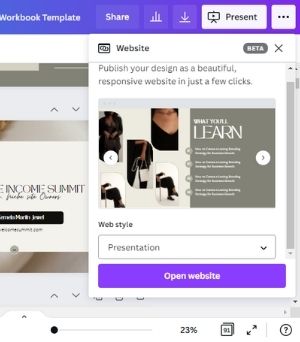
To share your presentation as a full-screen website, click on the 3 Dots icon at the top right of your Canva top toolbar, and a new window will pop up.
In the new window, click on “Website” under the “Share” Category and select the Canva websites options available (Presentation, Scrolling, Classic Navigation, and standard).

Some Canva tips for Sharing your Canva Presentation as full-screen websites;
Presentation: Multiple page sites with easy controls
Scrolling: single-page site with parallax effect
Classic Navigation: Multiple page site with a navigation bar
Standard: Single page site with a navigation bar.
53 | Create Instagram Bio Link Website with Canva
Do you know you don’t have to pay to have a beautiful custom Instagram bio link website?
Choose any template in Canva or create from scratch, add your link, and after editing, click on share as a website, copy the link and paste it in your Instagram bio.
The only downside is that Canva is yet to modify the Canva Bio website link to look short and neat. Use link shorteners to make your link short and neat.
PS: check out and use my Canva bio link website in the Canva library
54 | Use Canva Keyboard Shortcuts
Knowing and using the Canva keyboard shortcuts is one of the most important Canva tips and tricks for beginners and pro-Canva users.
It helps you save time and makes designing easy and less overwhelming.
Below are some Canva Keyboard Shortcut hacks and guides;
- Add a circle shape: Click the “C” key
- Insert a text box: Click the “T” key
- Add a line to your document: Click the “L” key
- Add a rectangle to your document: Click the “R” key
- Transform text to Uppercase: Shift + cmd/ctrl + “K” key
- Italicize text: ctrl/cmd + “I” key
- Bold text: ctrl/cmd + “B” key
- Duplicate elements: cmd/ctrl + “D” key
- Group Elements: ctrl/cmd + “G” key
- Ungroup Elements: shift + cmd/ctrl + “G” key
- Select all items on layer: cmd/ctrl + “A” key
- To Zoom in: ctrl/cmd + “+” key
- To Zoom out: ctrl/cmd + “–” key
- Move Element forward: ctrl/cmd + “] “
- Move Element backward: ctrl/cmd + “[
More Helpful Blogs and Canva Tips for You
- 50+ Best Cursive and Script Font on Canva for Eye-Catchy Designs
- 35 Best Elegant Aesthetic fonts on Canva for Eye-Catchy Designs
- 23 Best Boho fonts on Canva for Stunning & Jaw-Dropping Designs
- How to Upload Fonts to Canva Quickly + Find Free and Pro Custom Fonts
- How to Create stunning Landing pages in Flodesk (NO Websites Required)
- Easy Steps for Adding a Clickable Hyperlink to Your Pdf and Designs in Canva
- Canva Guide: 50+ Ultimate Canva Tips and Tricks for using Canva 2x Better
- How to Create Multiple Pinterest Pins in Canva (Free Templates)
- How to Create Unique Holiday Gift Guides for your Blog in Canva
- How to Create Stunning Ebooks in Canva (+Free Ebook Templates)
- 80+ Best Canva Fonts: Ultimate Canva Font Guide for Choosing and Pairing Fonts
Finally, on Canva Guide: 50+ Best Canva Tips and Tricks
Canva transforms how you create, design your business assets, and how you put your business out there.
But, knowing how to navigate Canva and enjoy the amazing features, tools and resources available to you on Canva will help you become more productive.
I know this Canva guide: 50+ Canva Tips and tricks will change how you navigate and use Canva.
Leave a comment, and let me know which Canva tips or tricks will change how you design from today? What Canva tip did you find super useful?
Found this post useful? Save on Pinterest!




Honestly, this is the most comprehensive guide ever. I have been using Canva for more than a year now for my business and I’m happy to learn some of these features that will help me create designs faster.
Thank you for sharing this.
Hello, I’m super happy you found this guide helpful.
You really packed a lot of valuable information into this post! I’ve been using Canva for a while now, so I knew quite a few of these, but, there was some things that were new to me and have potential!! ALT + Drag to Scale Proportionally was a new discovery for me, and it seems like it could make a huge difference in some projects. And, I never knew you could look at your version history! Thank you for sharing this helpful information!!
Hello Bethany. Thank you somuch for your kind words. I’m glad you found this post valuable. I absolutely love the ALT+ Drag feature and the Canva search Icon remains one of my favourite tool. As a creator, it completely changed how I look for images with similar aesthetics.
Informative post!
I’ve been using Canva for years now and surprisingly there are features that
I’m still not aware of it.
Thanks for sharing!
Wow, those are some excellent suggestions, and I had no idea they existed. Canva’s possibilities are truly limitless, and I’ll bookmark it for future reference. Thank you very much for your excellent post.
I am so glad you shared this information. It is very helpful for me.
Glad you found it useful